

Create Job
Creating a job in Skima AI is the starting point for how the AI understands your hiring requirements and evaluates candidates. Instead of scoring candidates against raw job description text, Skima AI builds a structured scoring rubric from your JD that you review and approve before any candidate is scored.
The job creation flow has three steps: Source, Job details, and Scoring criteria. Nothing is scored until you publish the rubric at the end.
In an Applicant Tracking System (ATS), a 'Rubric' is the scoring guide or grading matrix used to evaluate how well a candidate's resume or interview matches the job requirements.
AI Calibration uses only requirements clearly stated in the Job Description and skill evidence visible in the candidate's resume or application data. If a requirement is not written clearly or the relevant evidence is not visible, Skima AI cannot consider it during screening. This may affect a candidate's score or ranking even when the candidate meets the requirement.
Navigate to Jobs
Log in to your Skima AI account.
From the left sidebar, click on 'Jobs'.
This opens the Jobs page where you can view existing jobs, track scoring status, and manage your hiring pipeline.
Click on '+ New job' in the top-right corner to begin.
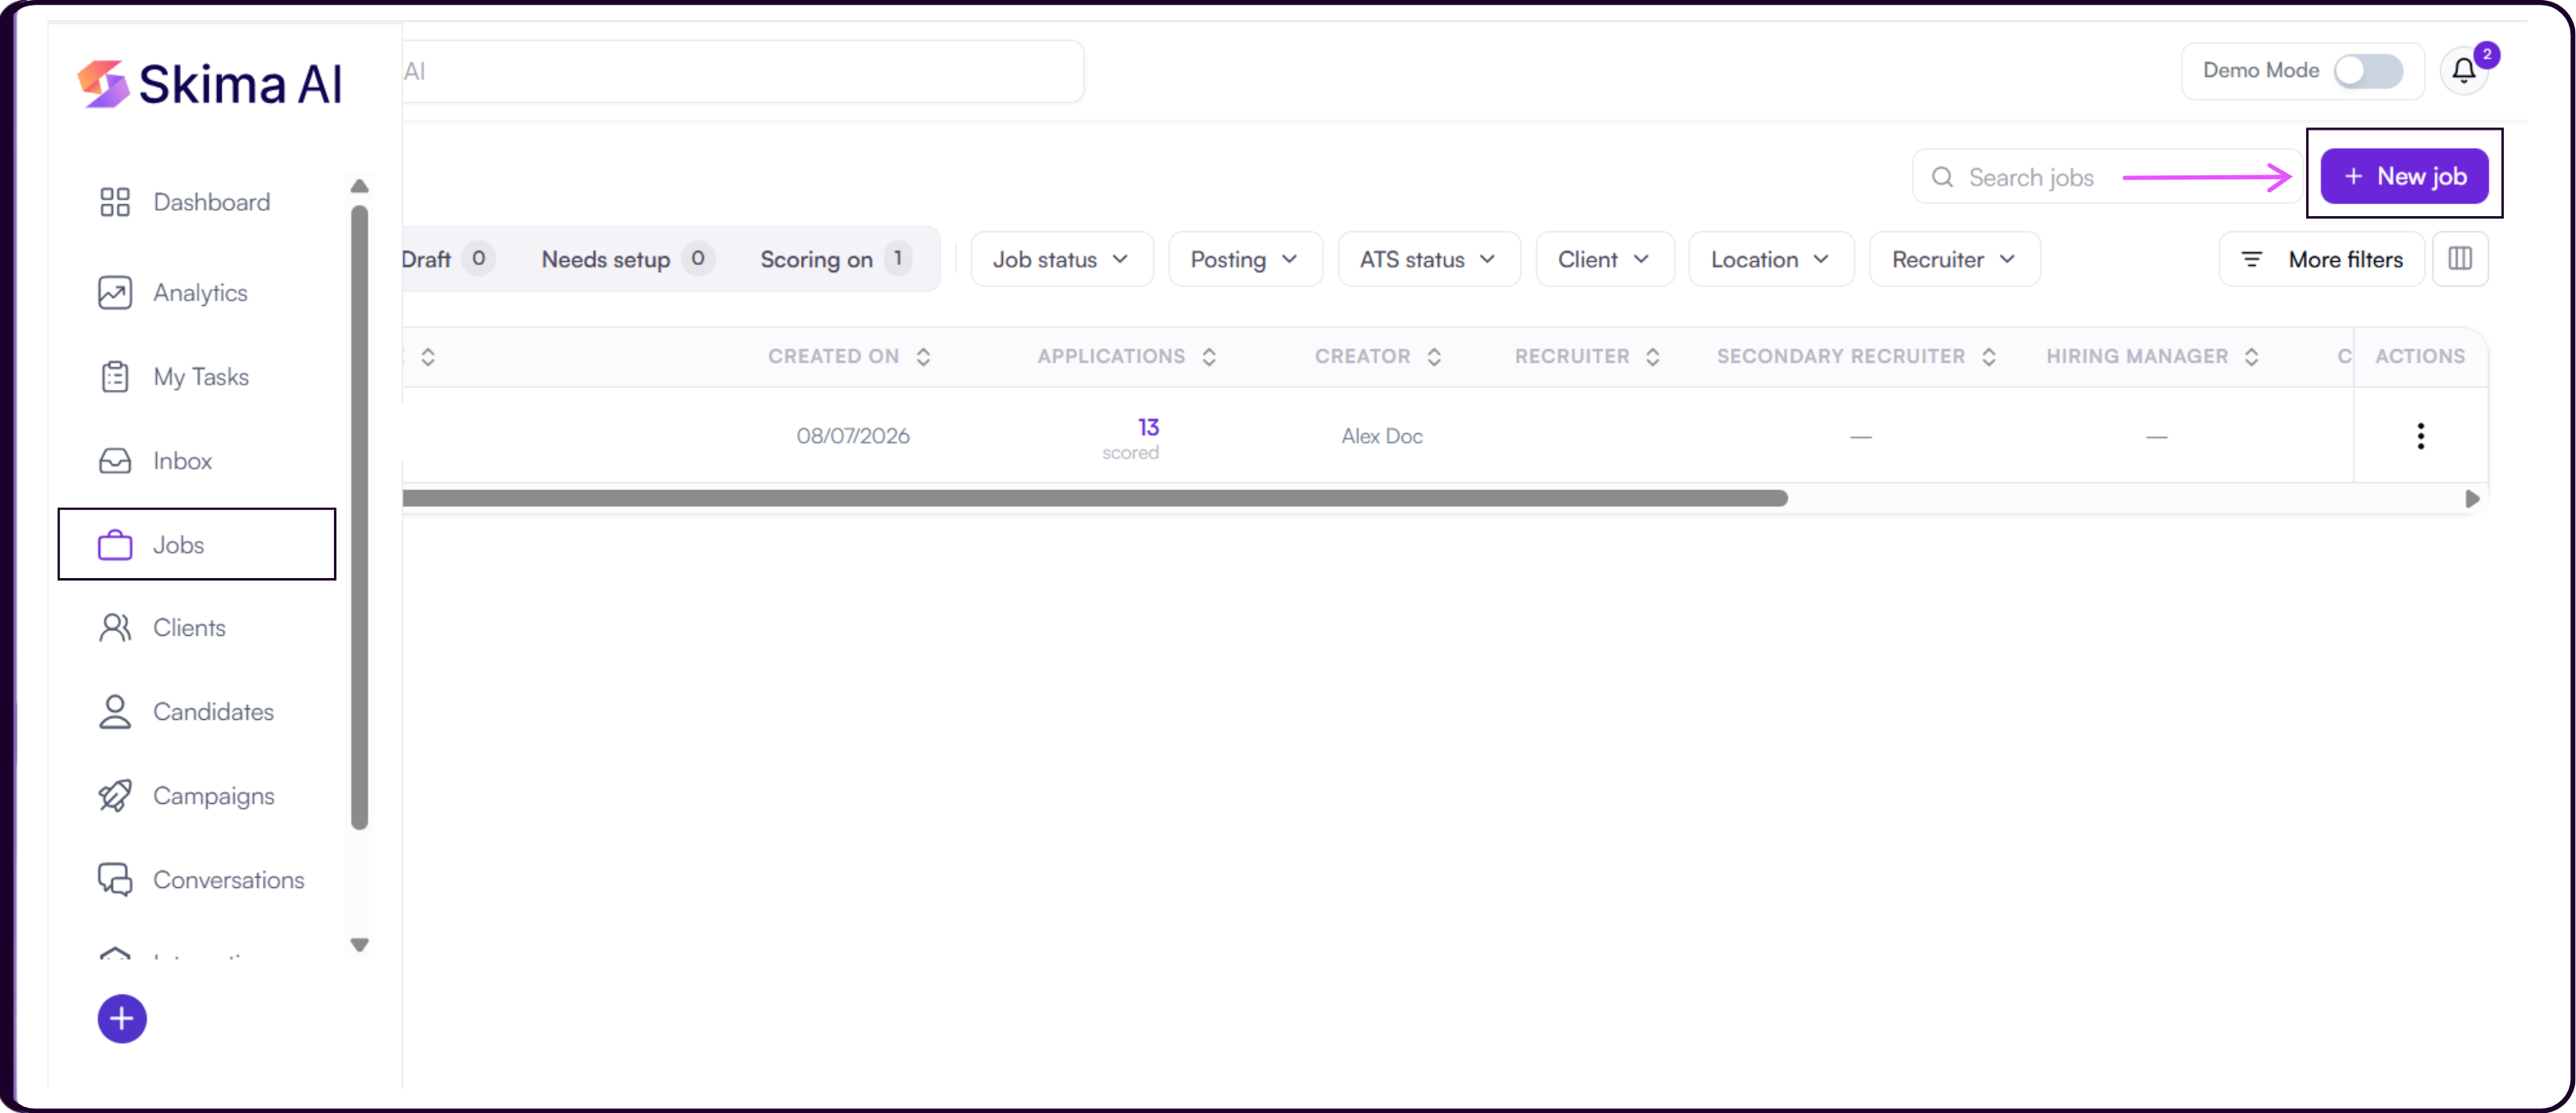
Jobs synced from your ATS appear here automatically. Open any synced job and choose 'Set up scoring' to add a rubric on top of it. You do not create ATS jobs manually inside Skima AI.
Step 1: Choose How to Create the Job
After clicking '+ New job', you will land on the 'Create a job' screen. There are two paths to start from.
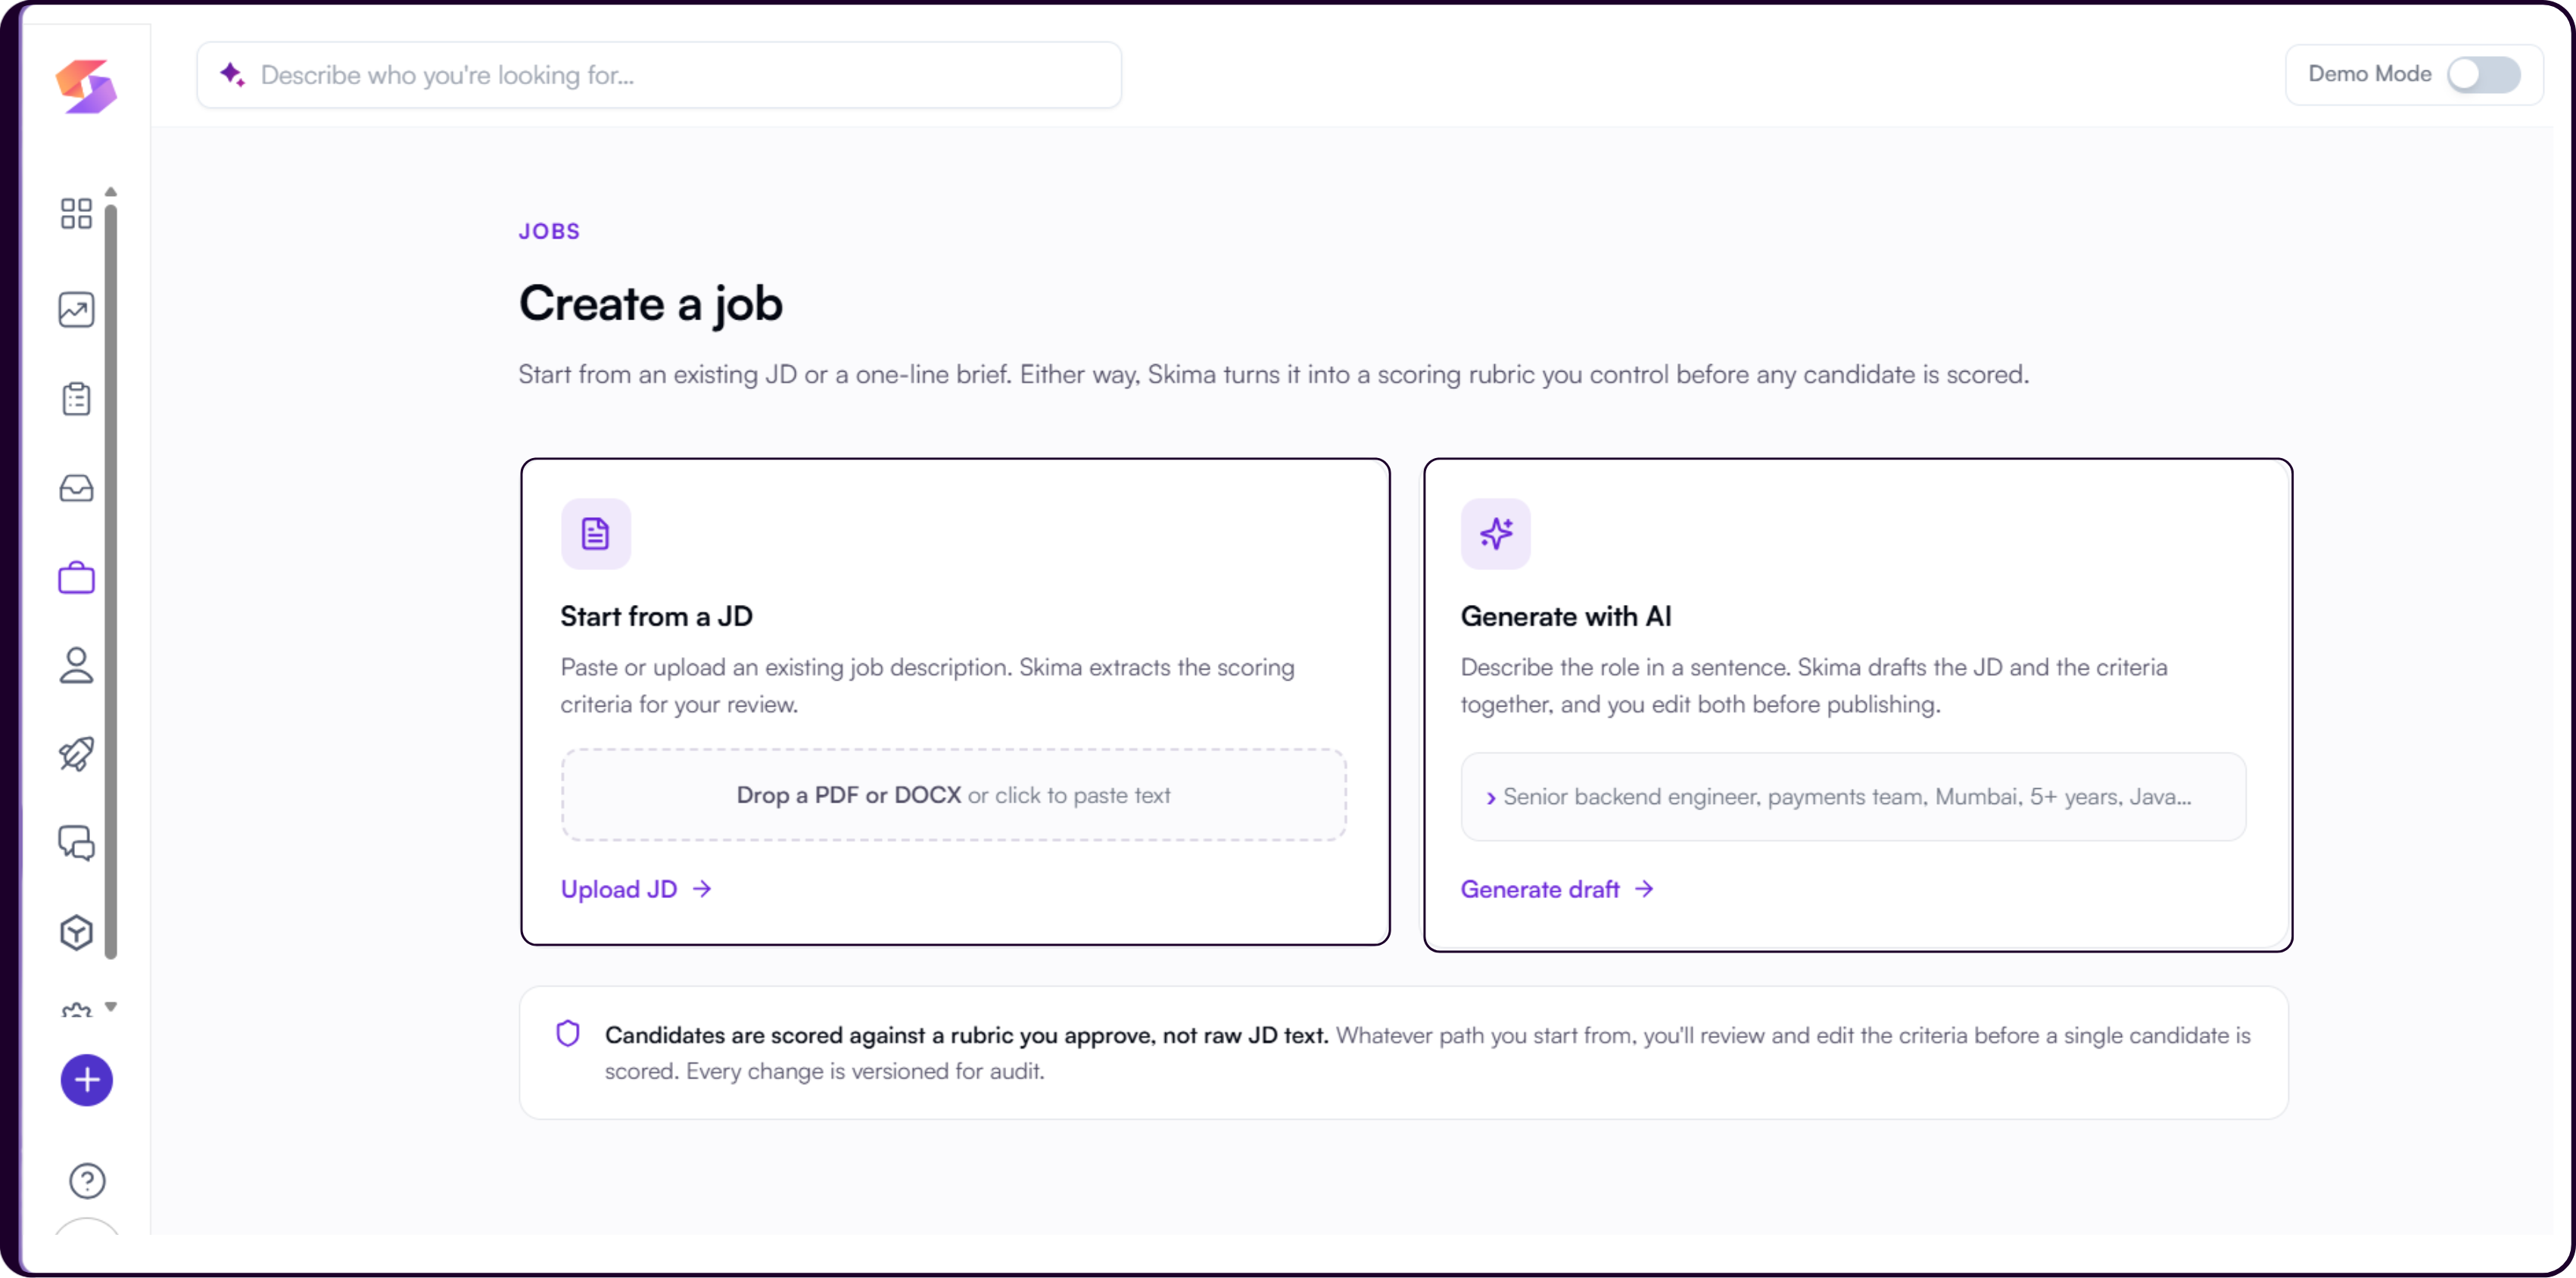
i. Start from a JD
Use this path if you already have a Job Description prepared.
Click 'Start from a JD'.
You will land on the 'Paste or upload your job description' screen.
Drop a PDF, DOCX, or TXT file into the upload area, or click 'browse' to select a file from your system. The file size limit is 1 MB.
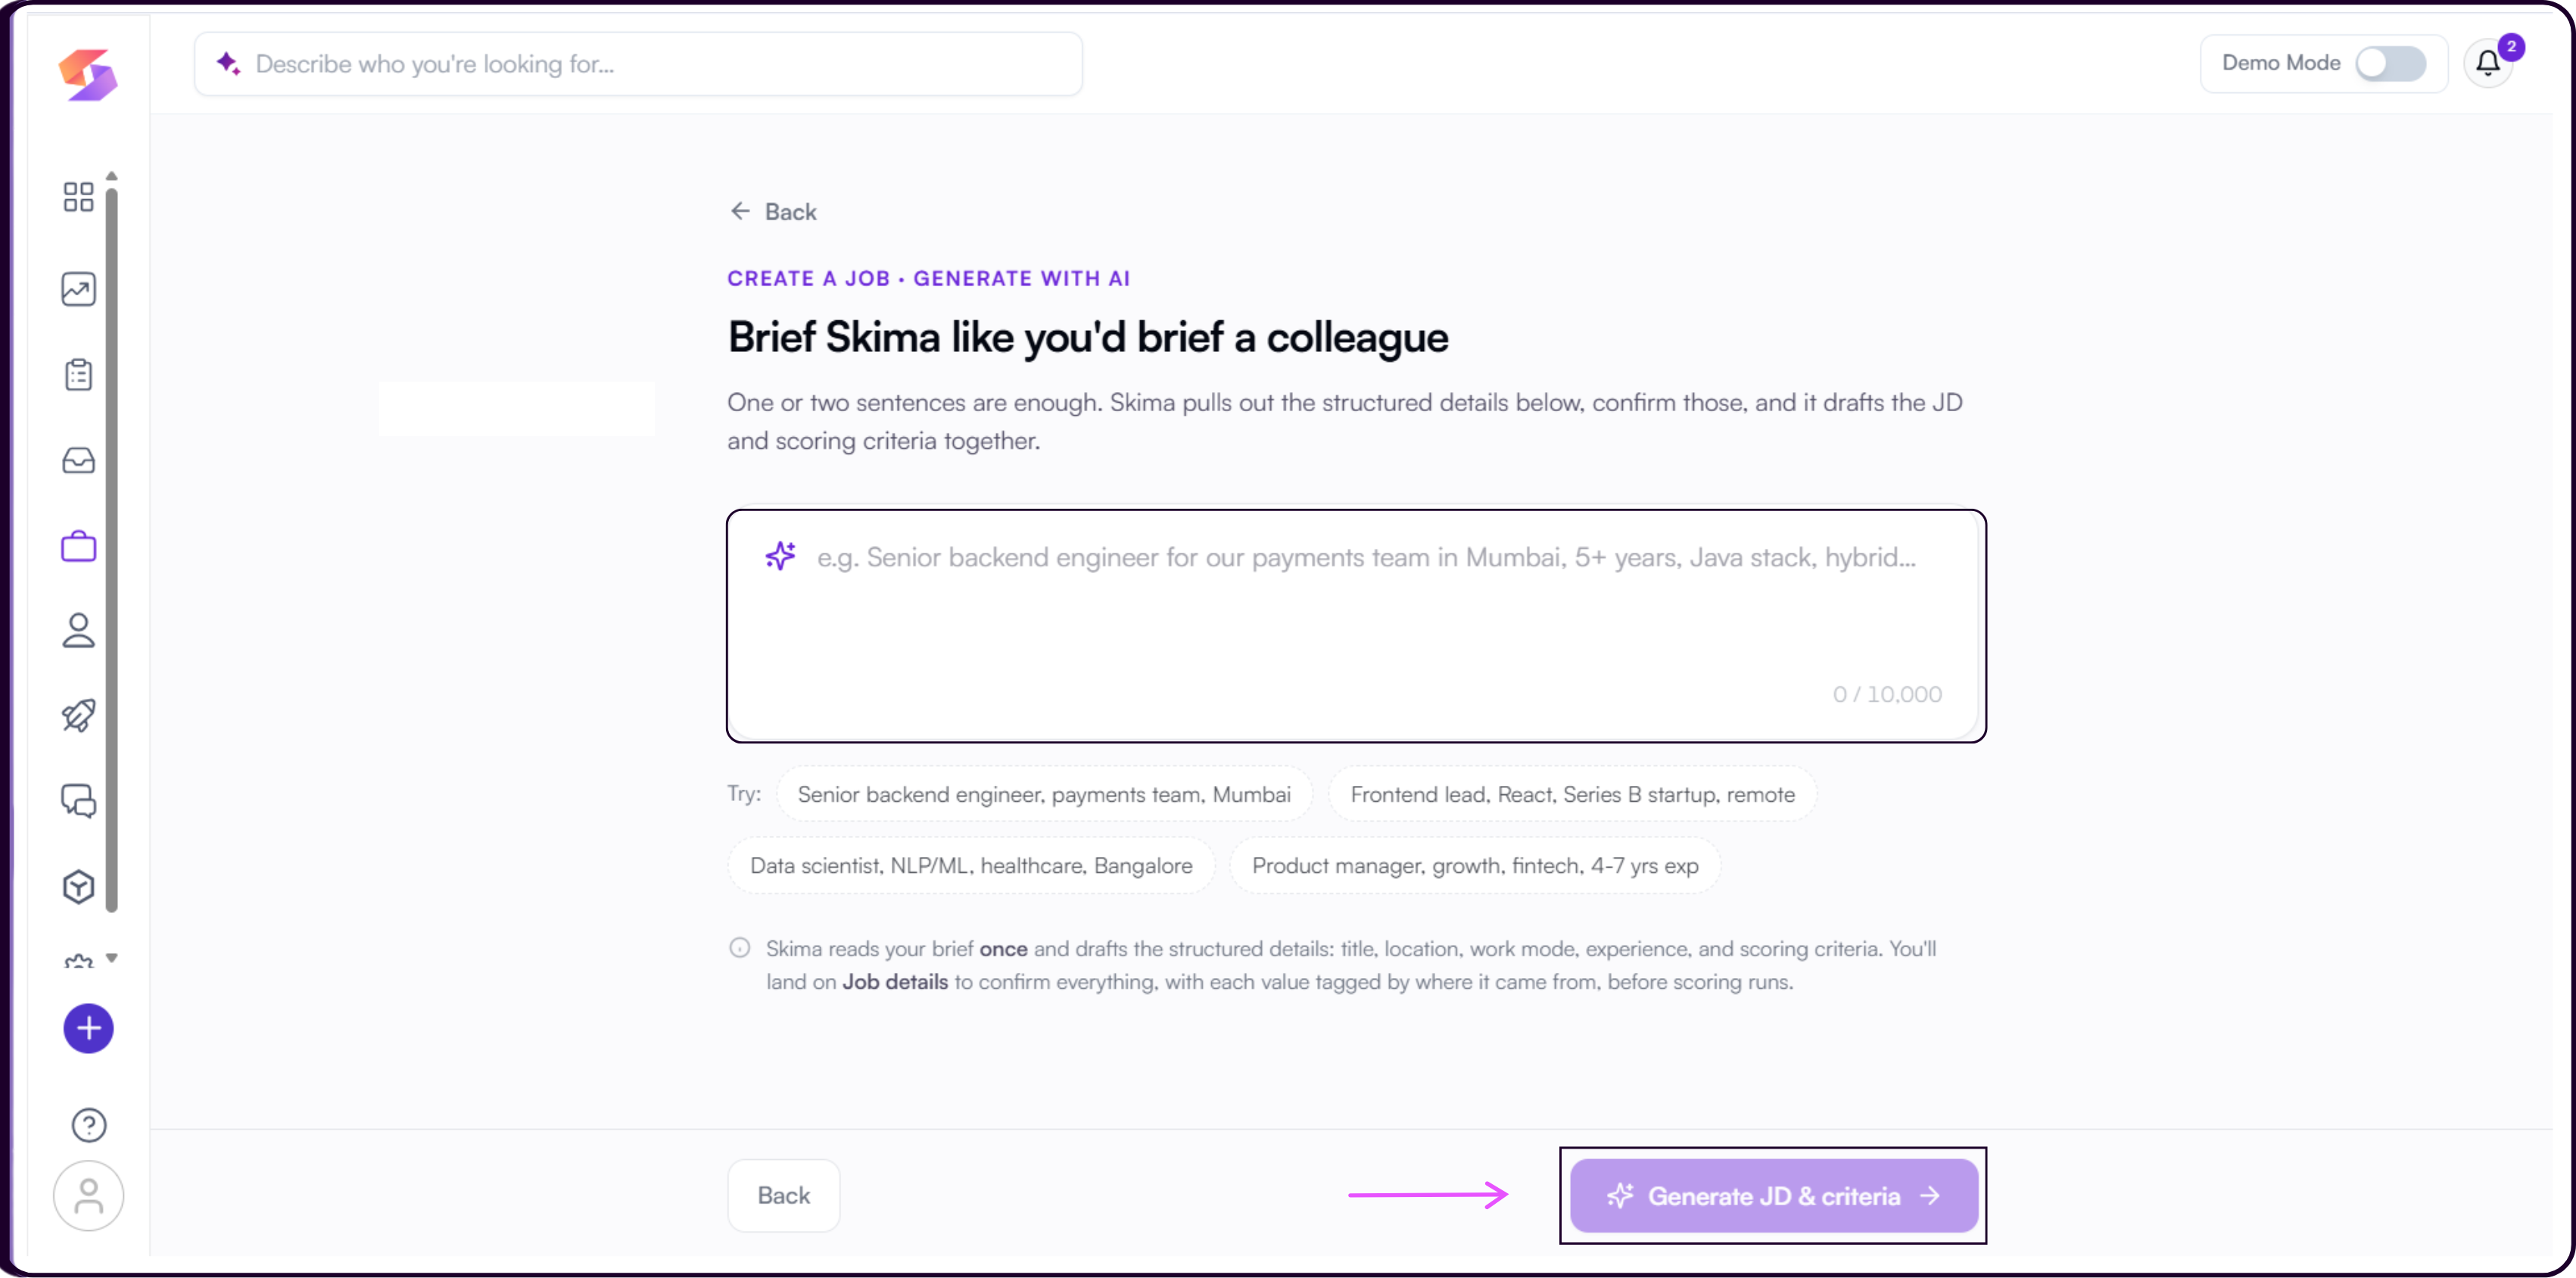
Alternatively, paste the job description text directly into the text area below.
Click 'Parse JD →' to continue.
Skima AI will extract the structured details from your JD and move you to the Job details step. It also checks the JD for language that could create hiring-compliance risk and excludes it from scoring by default.
ii. Generate with AI
Use this path if you do not have a JD prepared and want Skima AI to draft one for you.
Click 'Generate with AI'.
You will land on the 'Brief Skima like you'd brief a colleague' screen.
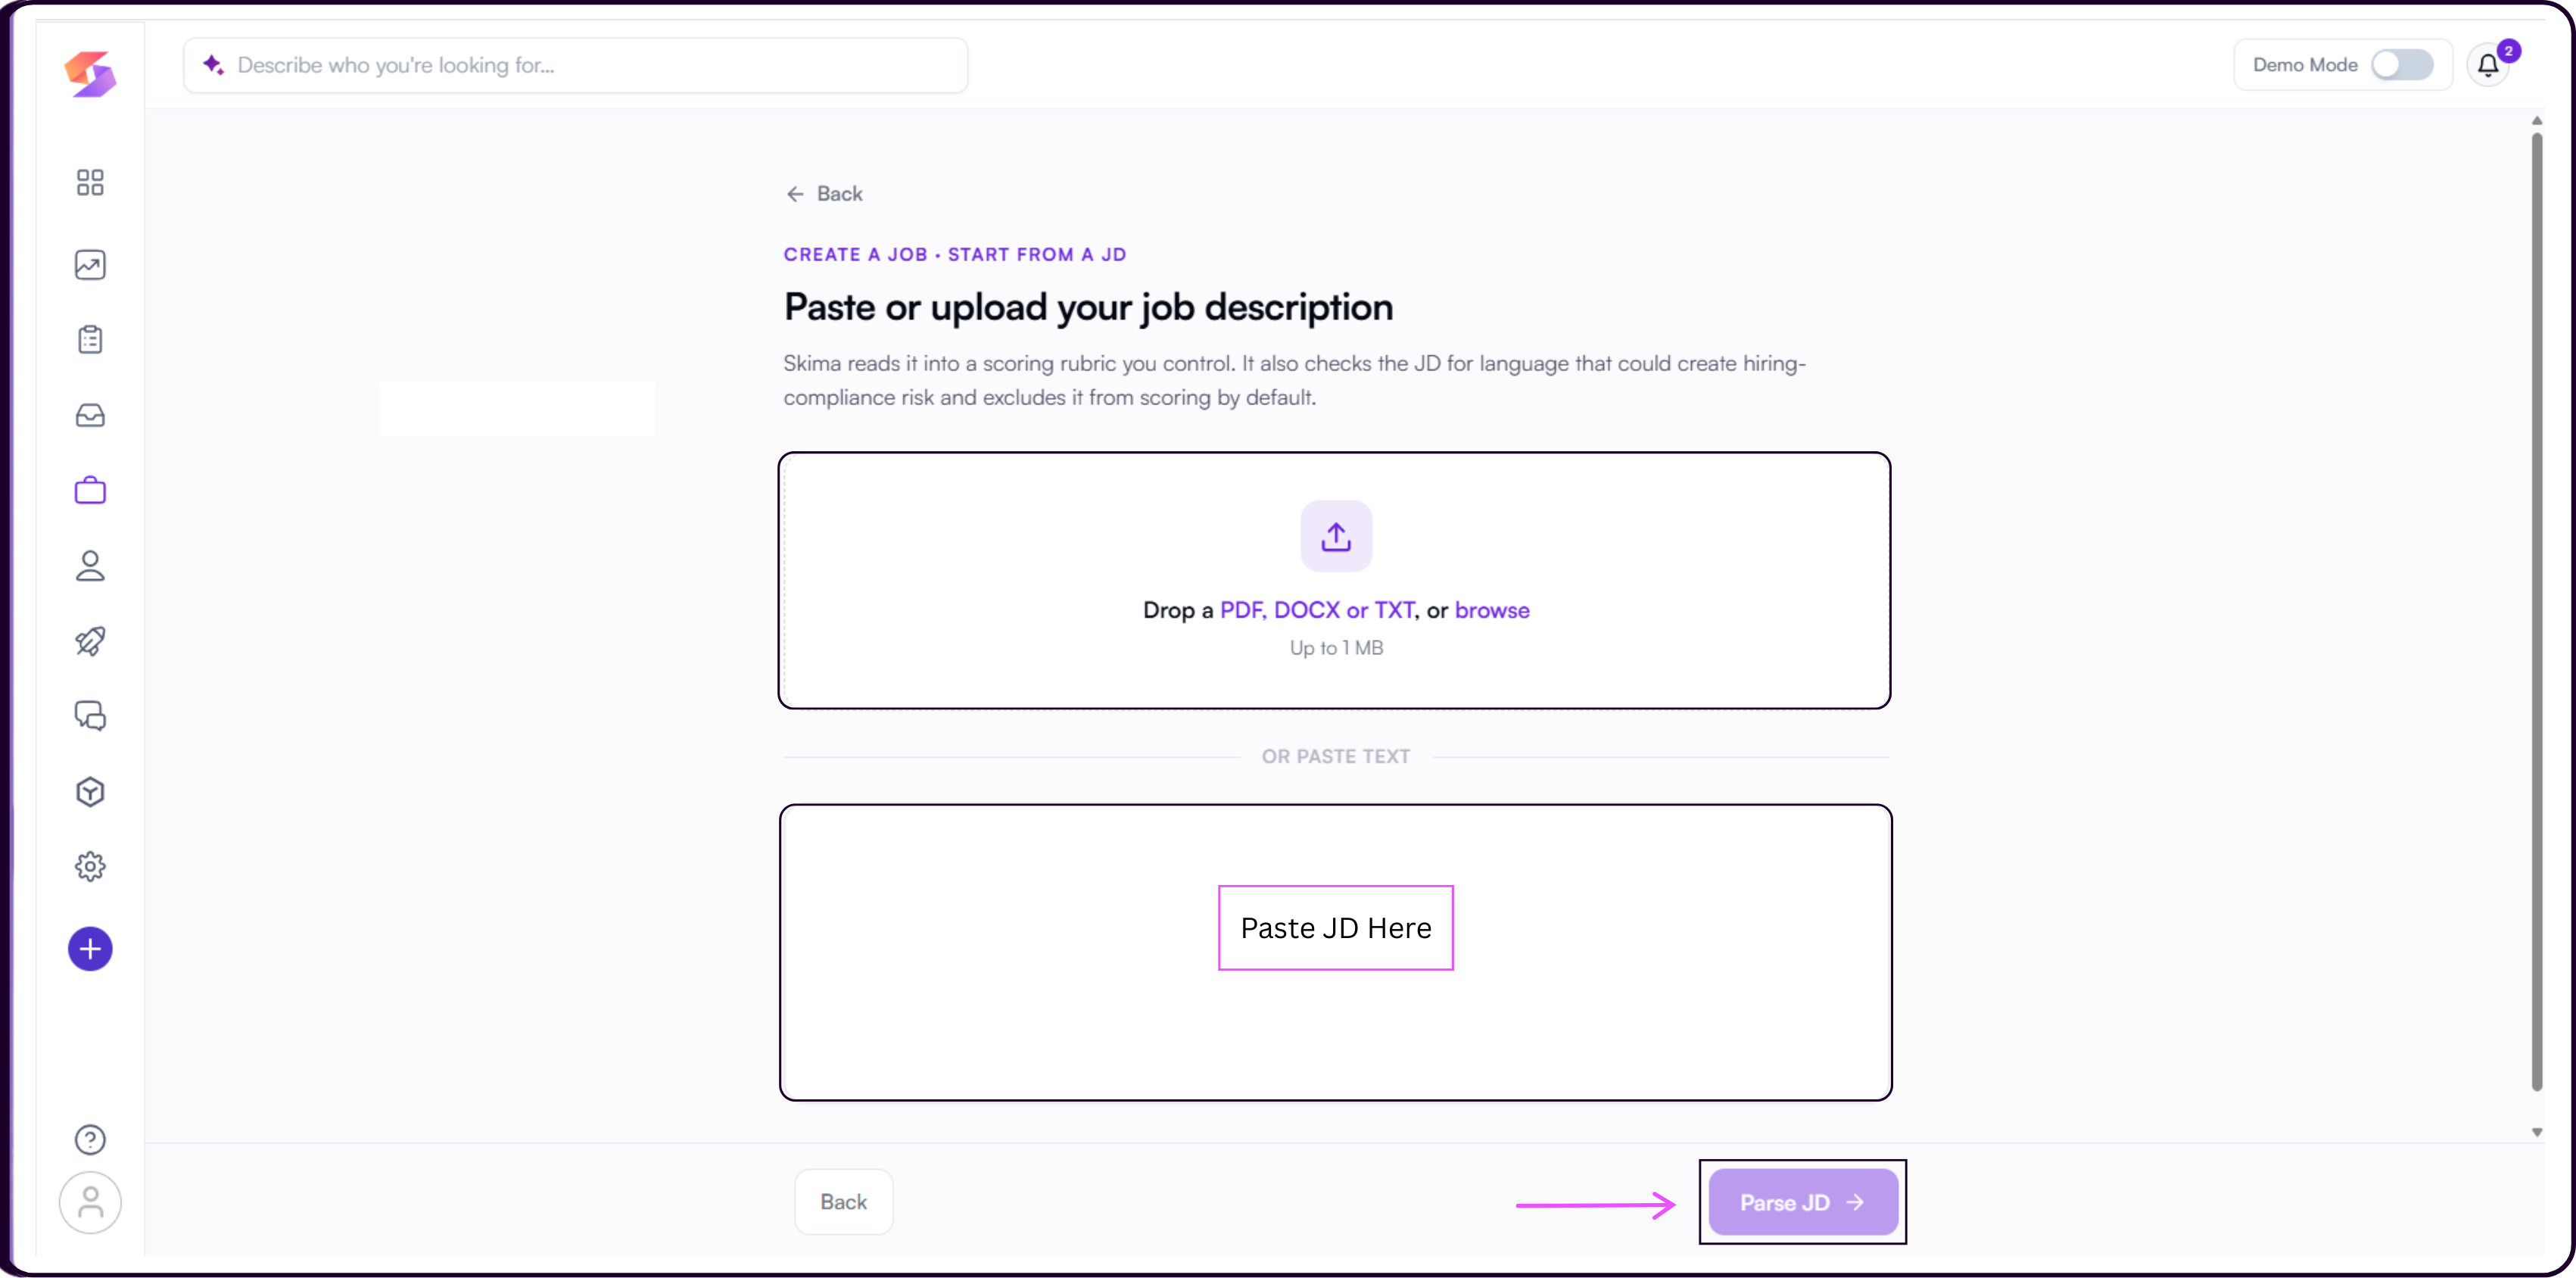
Type one or two sentences describing the role in the input field. Example prompts are provided on the page to help you get started.
Click 'Generate JD & criteria →'.
Skima AI will identify the key requirements from your brief and draft the JD and scoring criteria together. You will land on the Job details step to review and confirm everything before scoring runs.
Both paths converge at the same Job details step. The only difference is how Skima AI receives the initial role information.
Step 2: Confirm Job Details
After the JD is parsed or generated, you land on Step 2: Job details.
- Job record fields identify the job but do not affect who is included in scoring or how candidates are ranked.
- Filter fields include or exclude candidates entirely. Errors here directly affect which candidates are scored.
- Scoring criterion fields become weighted inputs in the rubric.
Each individual field also shows where its value came from.
- From JD means it was extracted directly from the job description.
- Assumed means Skima inferred it and needs your confirmation.
- Not set means it was not found and should be filled in.
- Added by you means the value was entered manually.
Once you have reviewed all fields, click 'Continue to scoring criteria →' in the top right to proceed, or 'Save draft' to return later.
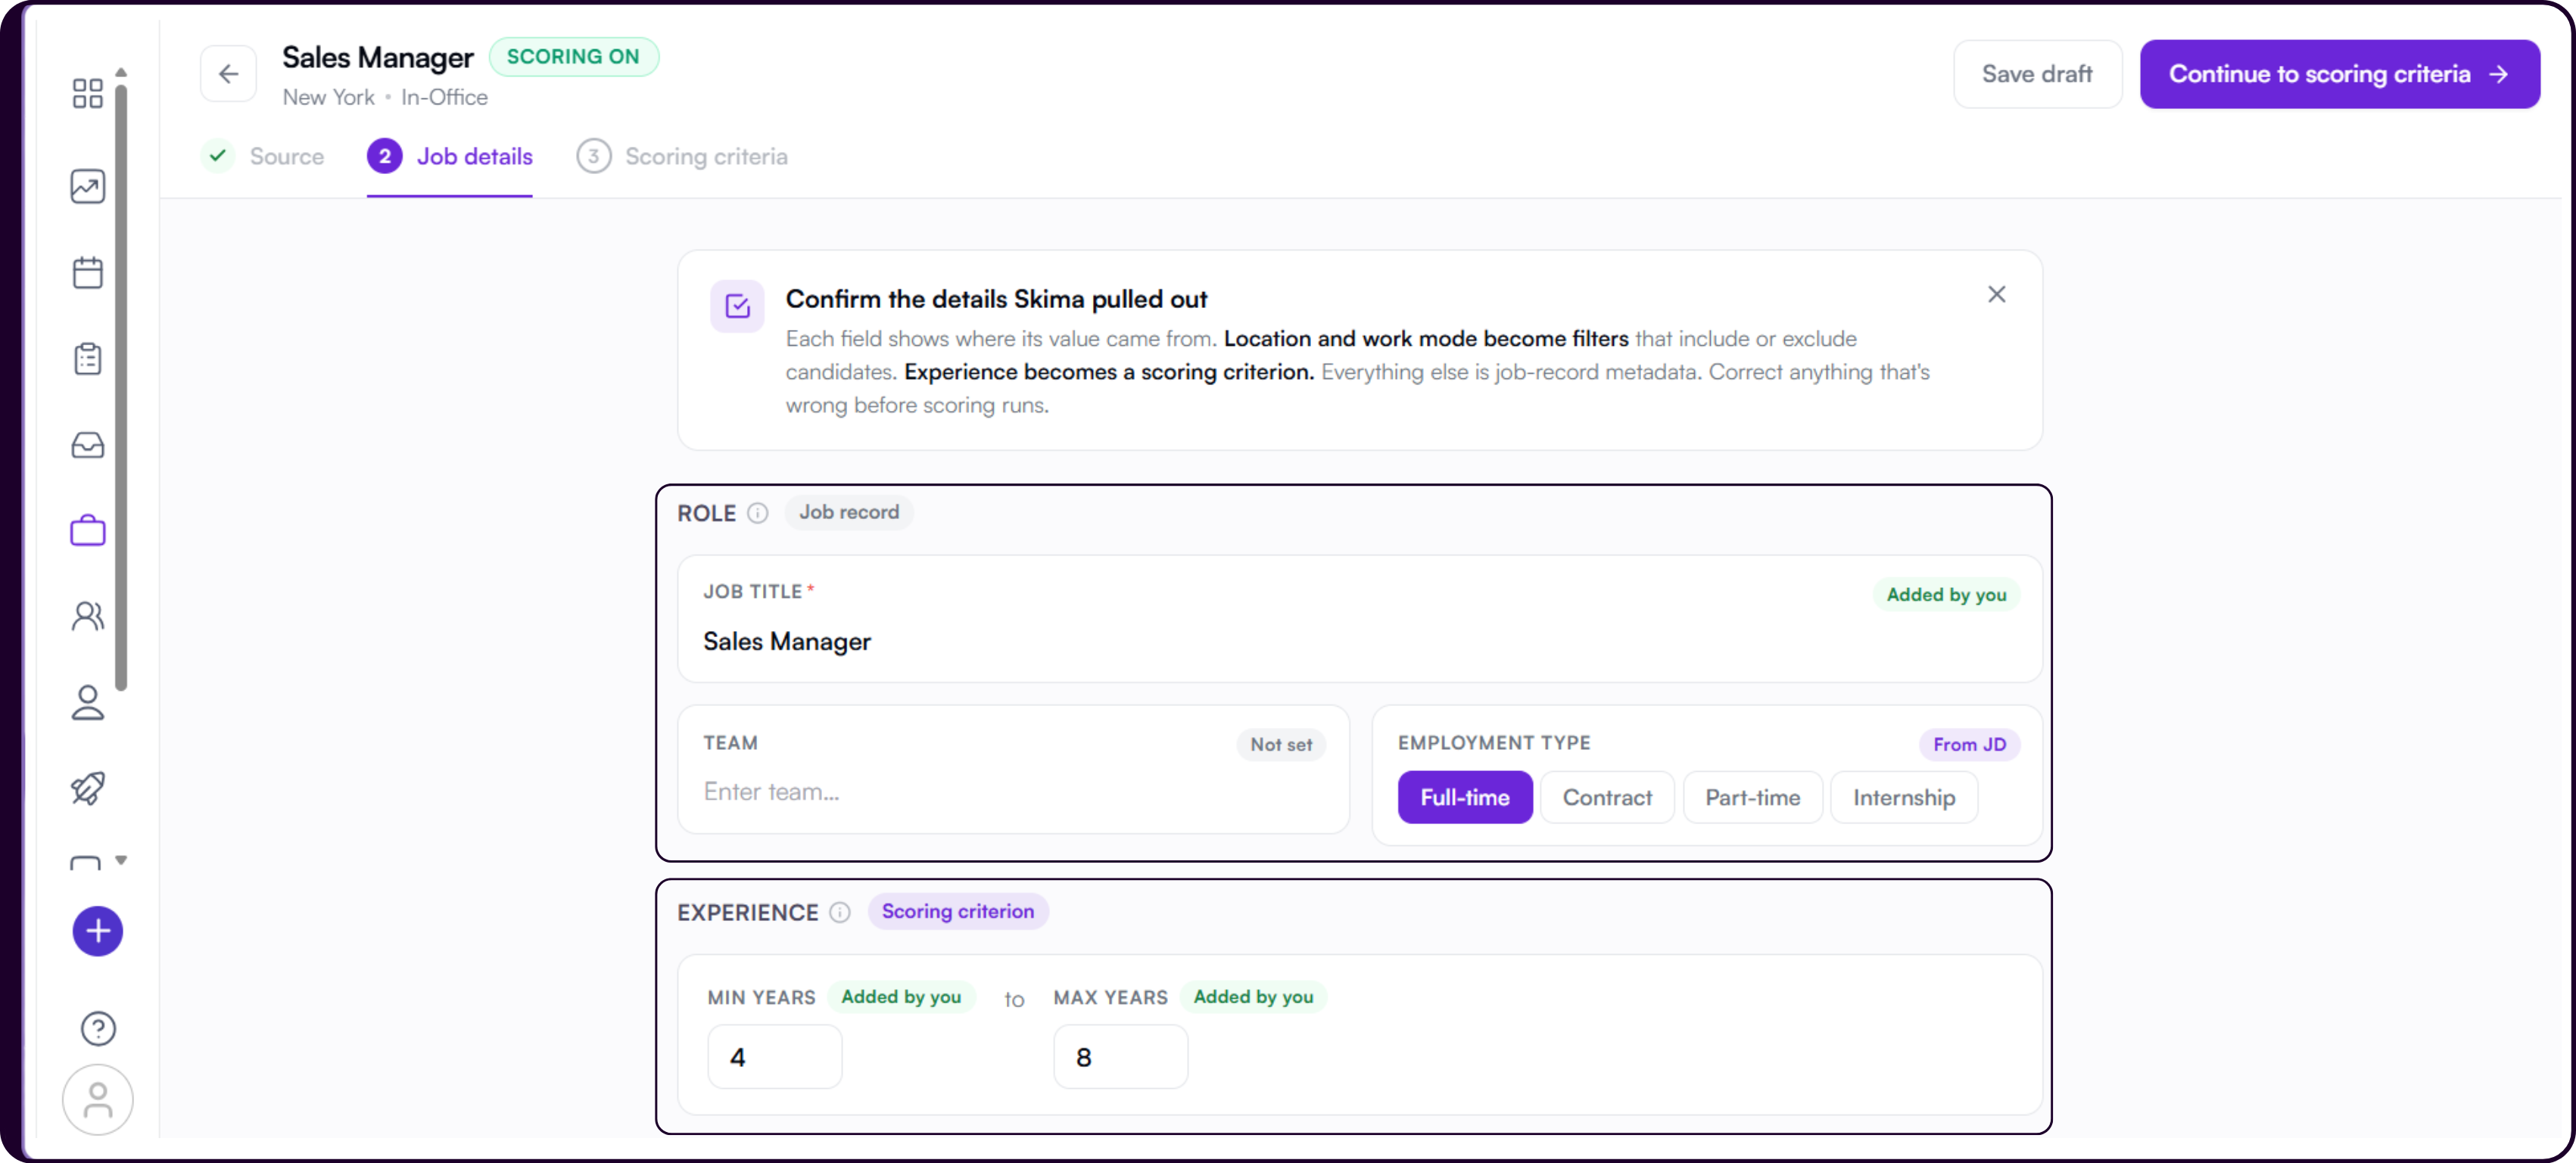
Role
The ROLE section is tagged Job record. These fields identify the job but do not affect who is included in scoring or how candidates are ranked.
Job Title is the primary identifier for the role. It may carry a From JD tag if extracted cleanly, or an Added by you tag if entered manually.
Team may appear as Assumed if Skima inferred it from the JD, or Not set if it could not be determined. Confirm or correct it before continuing.
Employment Type can be set to Full-time, Contract, Part-time, or Internship.
Experience
The EXPERIENCE section is tagged Scoring criterion. Unlike the other sections, the values here become a weighted input in the rubric candidates are scored against. Check the source tags carefully.
The section shows two fields: MIN YEARS and MAX YEARS. Each field carries its own source tag independently. Confirm or correct both values before continuing.
Location and Sourcing
The LOCATION & SOURCING section is tagged Filter. Pay extra attention to Candidate Sourcing here. Job location is straightforward but sourcing eligibility is rarely stated clearly in a JD, so Skima may not have the right value. Confirm it before moving on.
Work Mode sets how the role is structured operationally: In-Office, On-Site, Remote, or Hybrid.
Job Location is where the work happens, labeled where work happens in the UI.
Candidate Sourcing is labeled who's eligible to apply and has two options.
- Anywhere removes all location filters. Use this when the role is genuinely open to candidates regardless of where they are based and you are willing to consider relocation.
- Specific locations restricts eligibility to candidates in the places you list.
When Specific locations is selected, a SOURCE CANDIDATES FROM sub-section appears. Add locations using the '+ Add a city, region, or country' input. Each location extracted from the JD carries a From JD tag or an Added by you tag if entered manually
Below the location list, a Commute radius toggle lets you tighten sourcing to a daily-commute range around each location you have listed. Toggle it on and use the slider to set the distance in km. Leave it off if you want the entire city, region, or country to be eligible rather than just candidates within commuting distance.
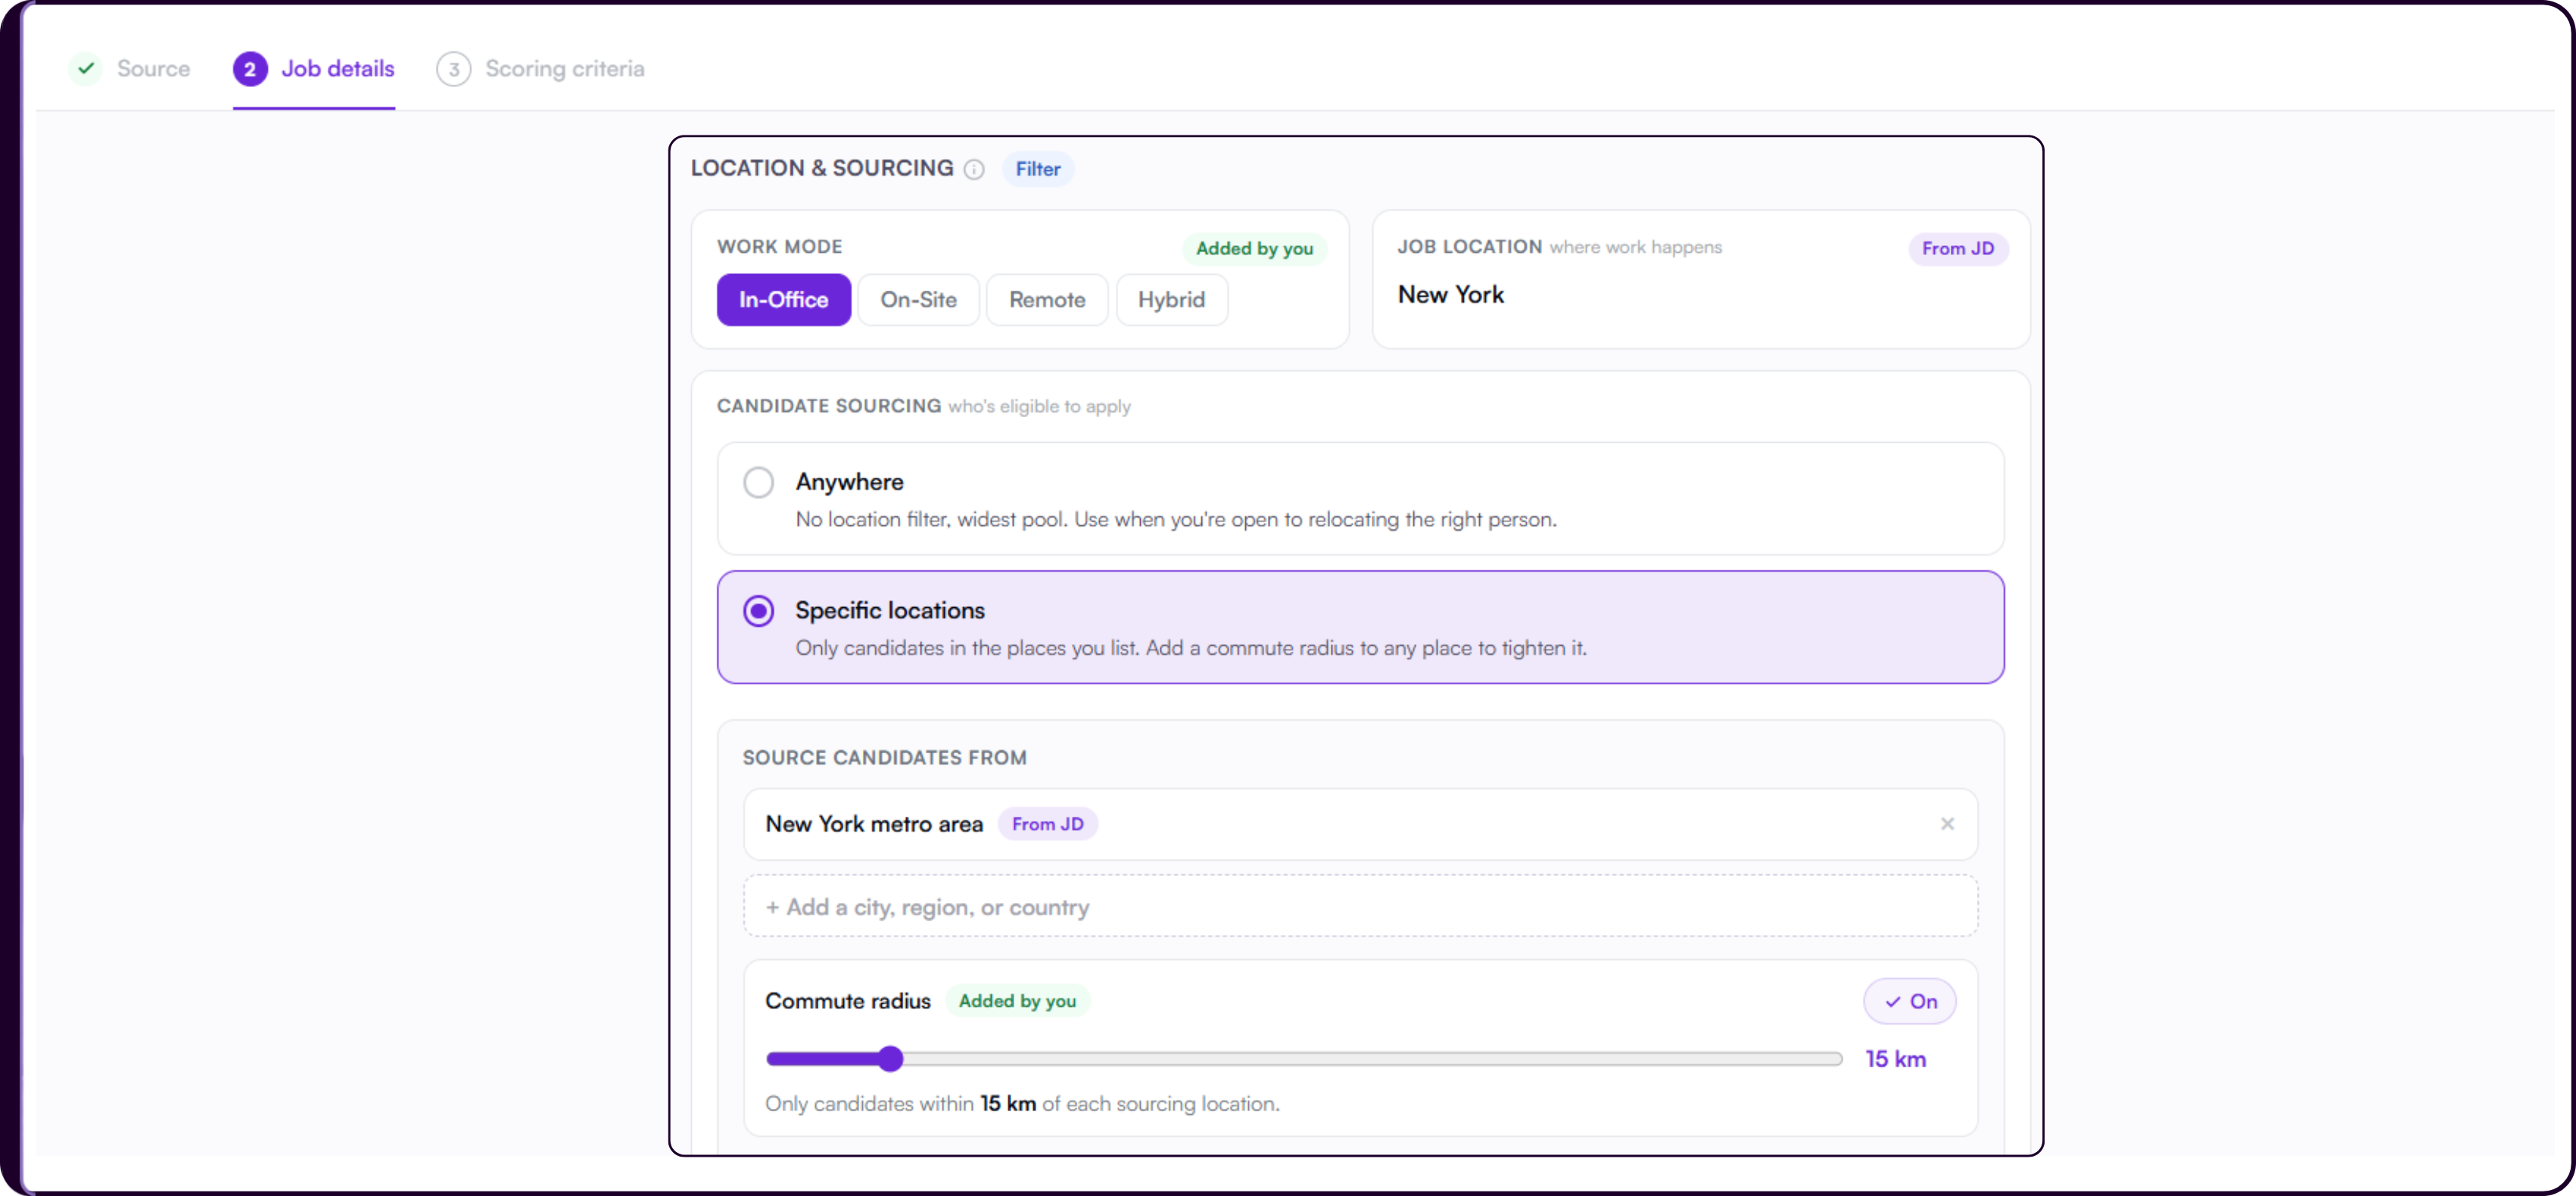
Correct any Assumed or Not set fields before continuing. Location and work mode filter candidates in or out entirely, so errors here directly affect which candidates are scored.
Additional Details
The ADDITIONAL DETAILS section is tagged Job record. These fields are job-record metadata and do not affect who is included in scoring or how candidates are ranked.
- Salary is optional. Set the Currency, a From and To range, and the Period. The default period is Per Annum. Each sub-field carries its own source tag and will show Added by you if entered manually.
.png)
Client lets you associate the job with a client from your Skima AI account. Start typing the client name and select from the dropdown. If the client does not exist yet, click '+ Add "[name]" as new client' to create it on the spot.
Job Posting Type sets whether the role is being hired for externally or internally. Select External posting for roles open to outside candidates, or Internal posting for roles open only to existing employees.
Step 3: Review and Publish Scoring Criteria
Step 3: Scoring criteria is where Skima AI turns your JD into the rubric candidates will be scored against. Nothing is scored until you publish the rubric.
The screen is split into two panels. The left panel shows the Job Description labeled Reference, with an 'Edit JD' option if you need to make changes. The right panel is where you review and publish the scoring rubric.
Compliance Flags
If the JD contains language referencing a protected attribute or a known proxy for one, a compliance flag section appears at the top of the right panel before the rubric, with the total number of flags shown.
Each flag shows the exact passage from the JD, why it was flagged, and an EXCLUDED FROM SCORING label. Skima excludes flagged language from scoring by default and logs every decision.
.png)
Once all flags have been acknowledged, an "All flags reviewed." confirmation appears at the bottom of the flags section alongside a 'View audit log' link.
Overriding a Flag
A criterion placed in the rubric via override appears with an [Ignored] prefix in its name and a Compliance issue tag beside the From JD source tag. In the AI Calibration panel, an OVERRIDE label in amber makes it visually distinct from standard criteria at all times.
.png)
Compliance mode and override permissions are managed by your workspace admin per jurisdiction. If you do not have override access, contact your admin.
Overridden Criteria in the Rubric
A criterion placed in the rubric via override appears with an [Ignored] prefix in its name and a Compliance issue tag beside the From JD source tag. In the AI Calibration panel, an OVERRIDE label in amber makes it visually distinct from standard criteria at all times.
Audit Log
Click 'View audit log' to open the Compliance audit log modal. Each entry shows the criterion name, the date the decision was made, who approved it, and the reason provided.
Overriding a compliance flag is a permanent audit event and may create legal exposure. Only override a flag when there is a specific, defensible business reason for the role. Consult your legal or compliance team before proceeding.
Edit the Job Description
Click 'Edit JD' on the left panel to open the inline rich text editor. It supports standard formatting controls: Normal style, Bold, Italic, Underline, Link, ordered and unordered lists, and clear formatting. Click 'Save' to apply changes or 'Cancel' to discard them.
When the rubric is generated, the JD panel highlights the specific passages each criterion was extracted from. This lets you trace exactly which part of the JD produced each criterion without switching panels.
Saving the JD does not automatically re-score candidates. You must update and publish the rubric for changes to take effect.
Generate Scoring Criteria
Once the JD is ready, click 'Generate scoring criteria' on the right panel. Skima reads the JD and builds a structured rubric.
The rubric is organized into four tiers.
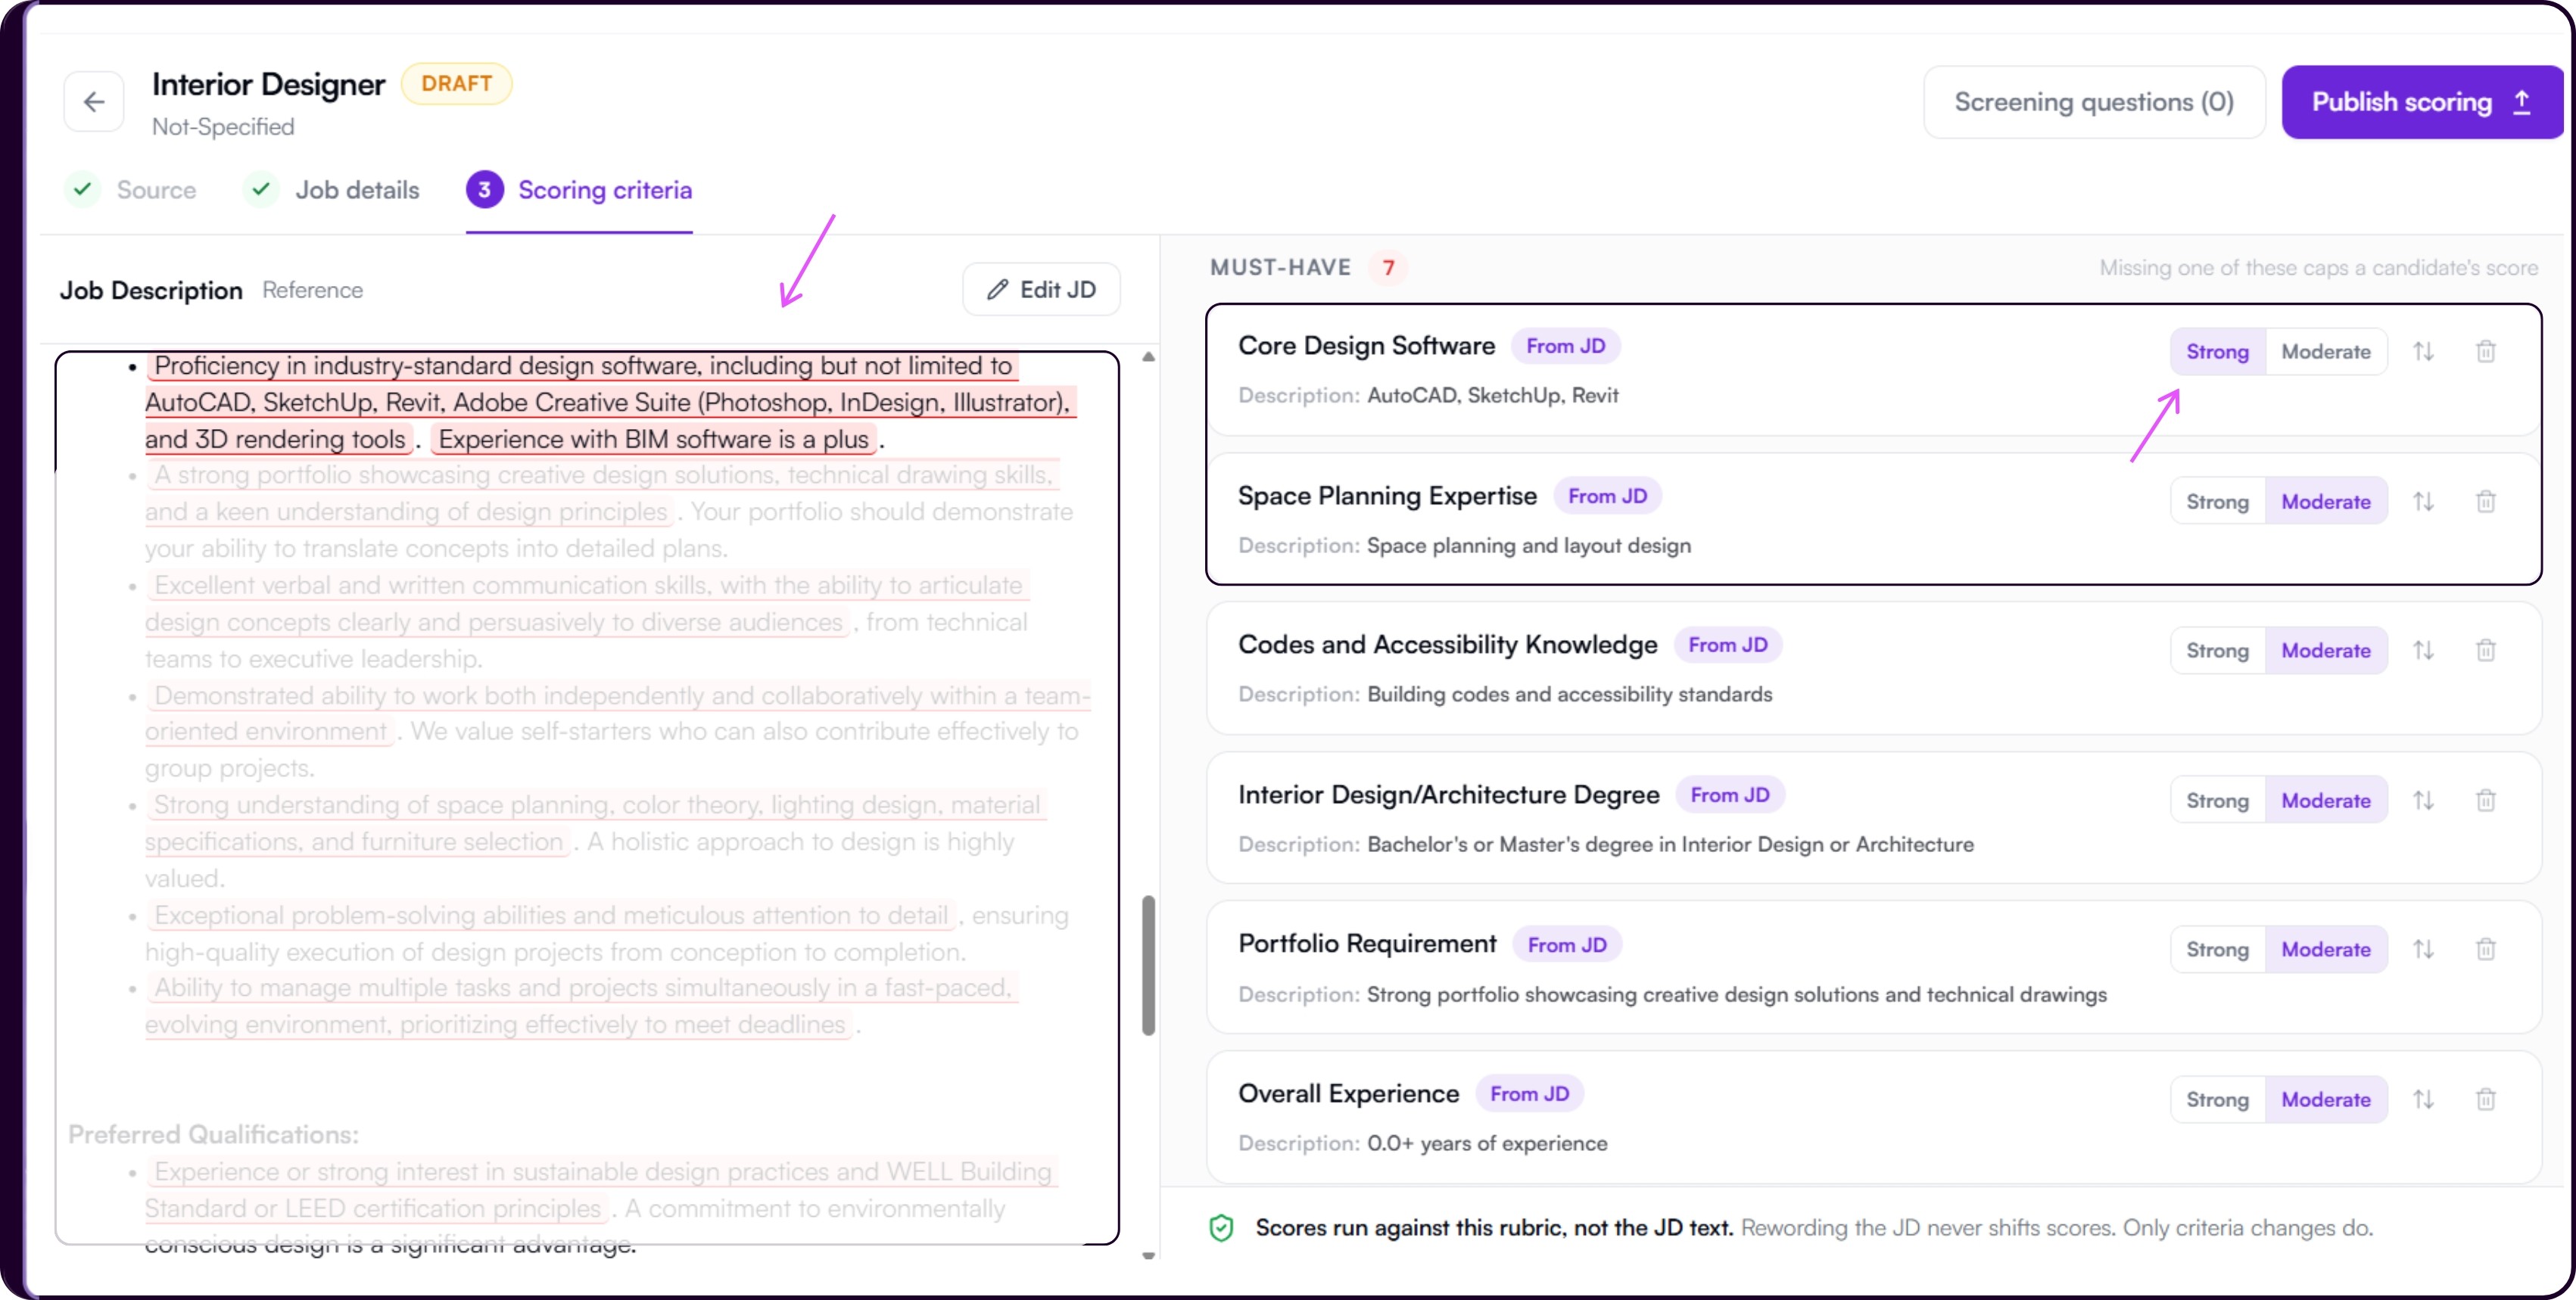
Must-have and Must-avoid: These are strict deal-breaker criteria and have the same effect on scoring and disqualification. A candidate is disqualified if they fail to meet a Must-have criterion or match a Must-avoid criterion. Both carry a strong deduction and appear in the candidate's disqualification reasons.
Preferred: Meeting this criterion improves a candidate's score. Missing it lowers the AI score but does not disqualify the candidate or appear as a disqualification reason.
Nice to have: This criterion usually has little to no effect on its own. It can act as a tiebreaker when candidates otherwise have the same score.
For a full breakdown of how much each tier actually affects a candidate's score, see Understanding the Four Tiers in the AI Calibration guide.
Each criterion card shows:
- The criterion name and its source tag: From JD for extracted criteria, Added by you for manually added ones, or Suggestion for criteria added from Skima Suggests
- A Description explaining the line to show what counts toward meeting the criterion
- The weight classification tags for the tier
- An up/down arrow icon to move the criterion to a different tier. Hover over it to see the 'Move to another bucket' tooltip
- A delete icon to remove the criterion entirely
Adding a Criterion
Each tier has a '+ Add a [tier] criterion' input at the bottom. Click it and type the criterion name directly. Press Enter to save it. The criterion is added with an Added by you tag.
Skima Suggests
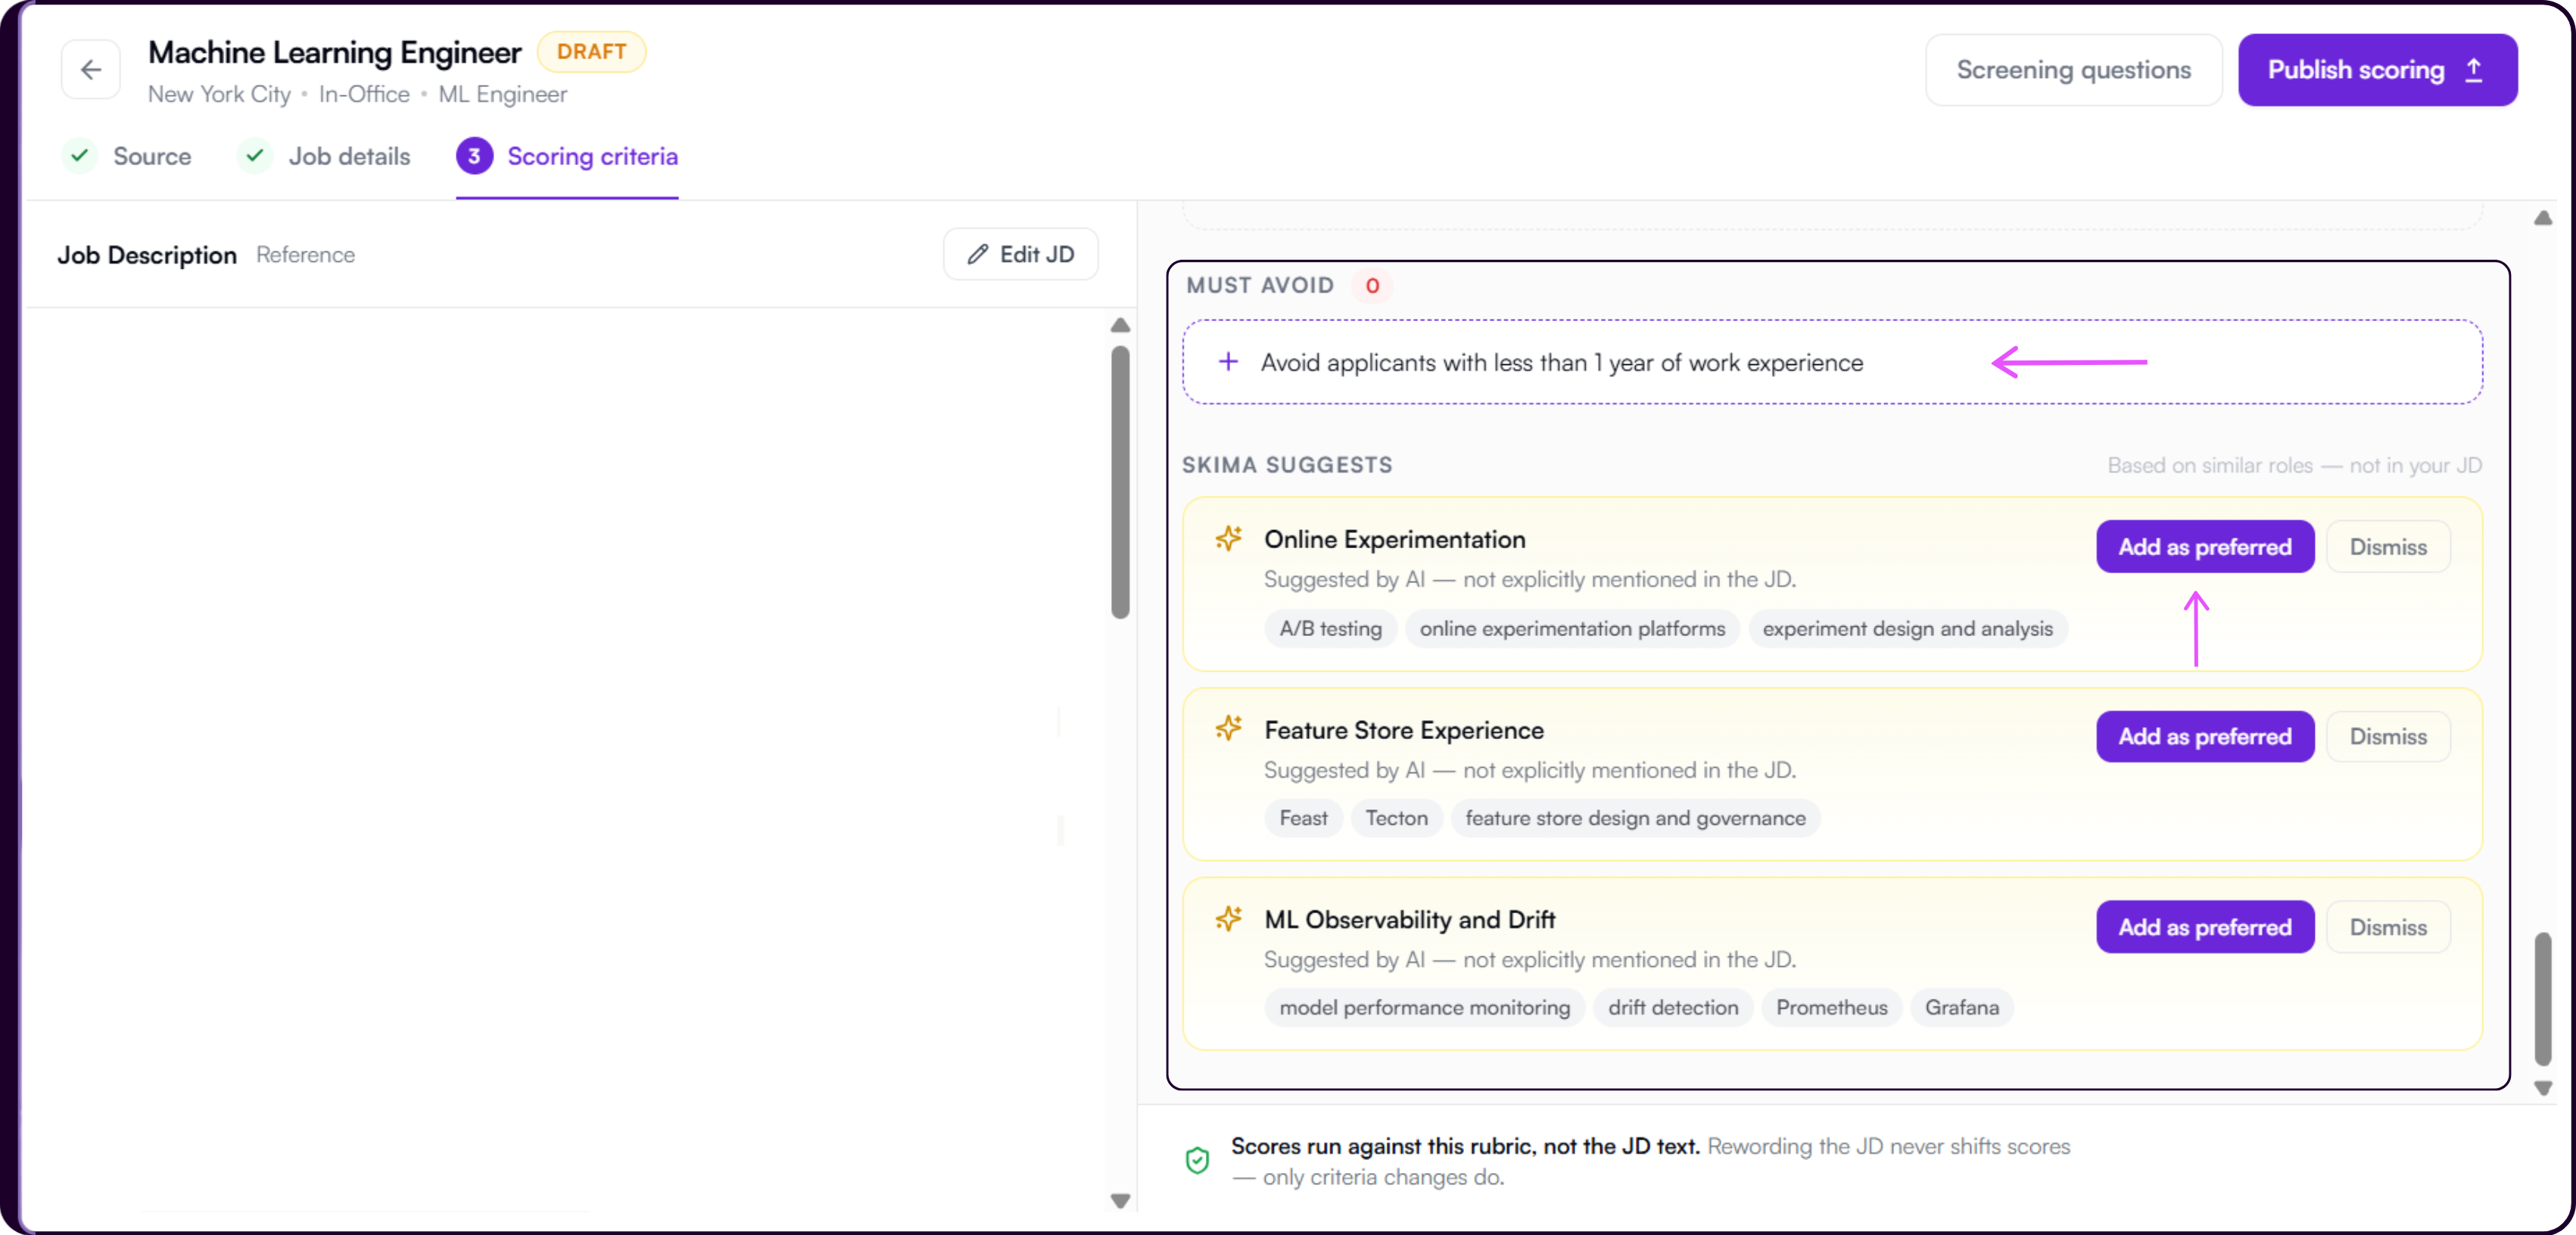
Below the rubric, a Skima Suggests section shows additional criteria based on similar roles that were not in your JD. Each suggestion carries a Suggestion source tag. Click 'Add as preferred' to place it in the Preferred tier or 'Dismiss' to ignore it.
When a suggestion is added it appears as a criterion card in the Preferred tier. You can edit its equivalents, reweight it, or move it to another tier the same way as any other criterion.
Add Screening Questions
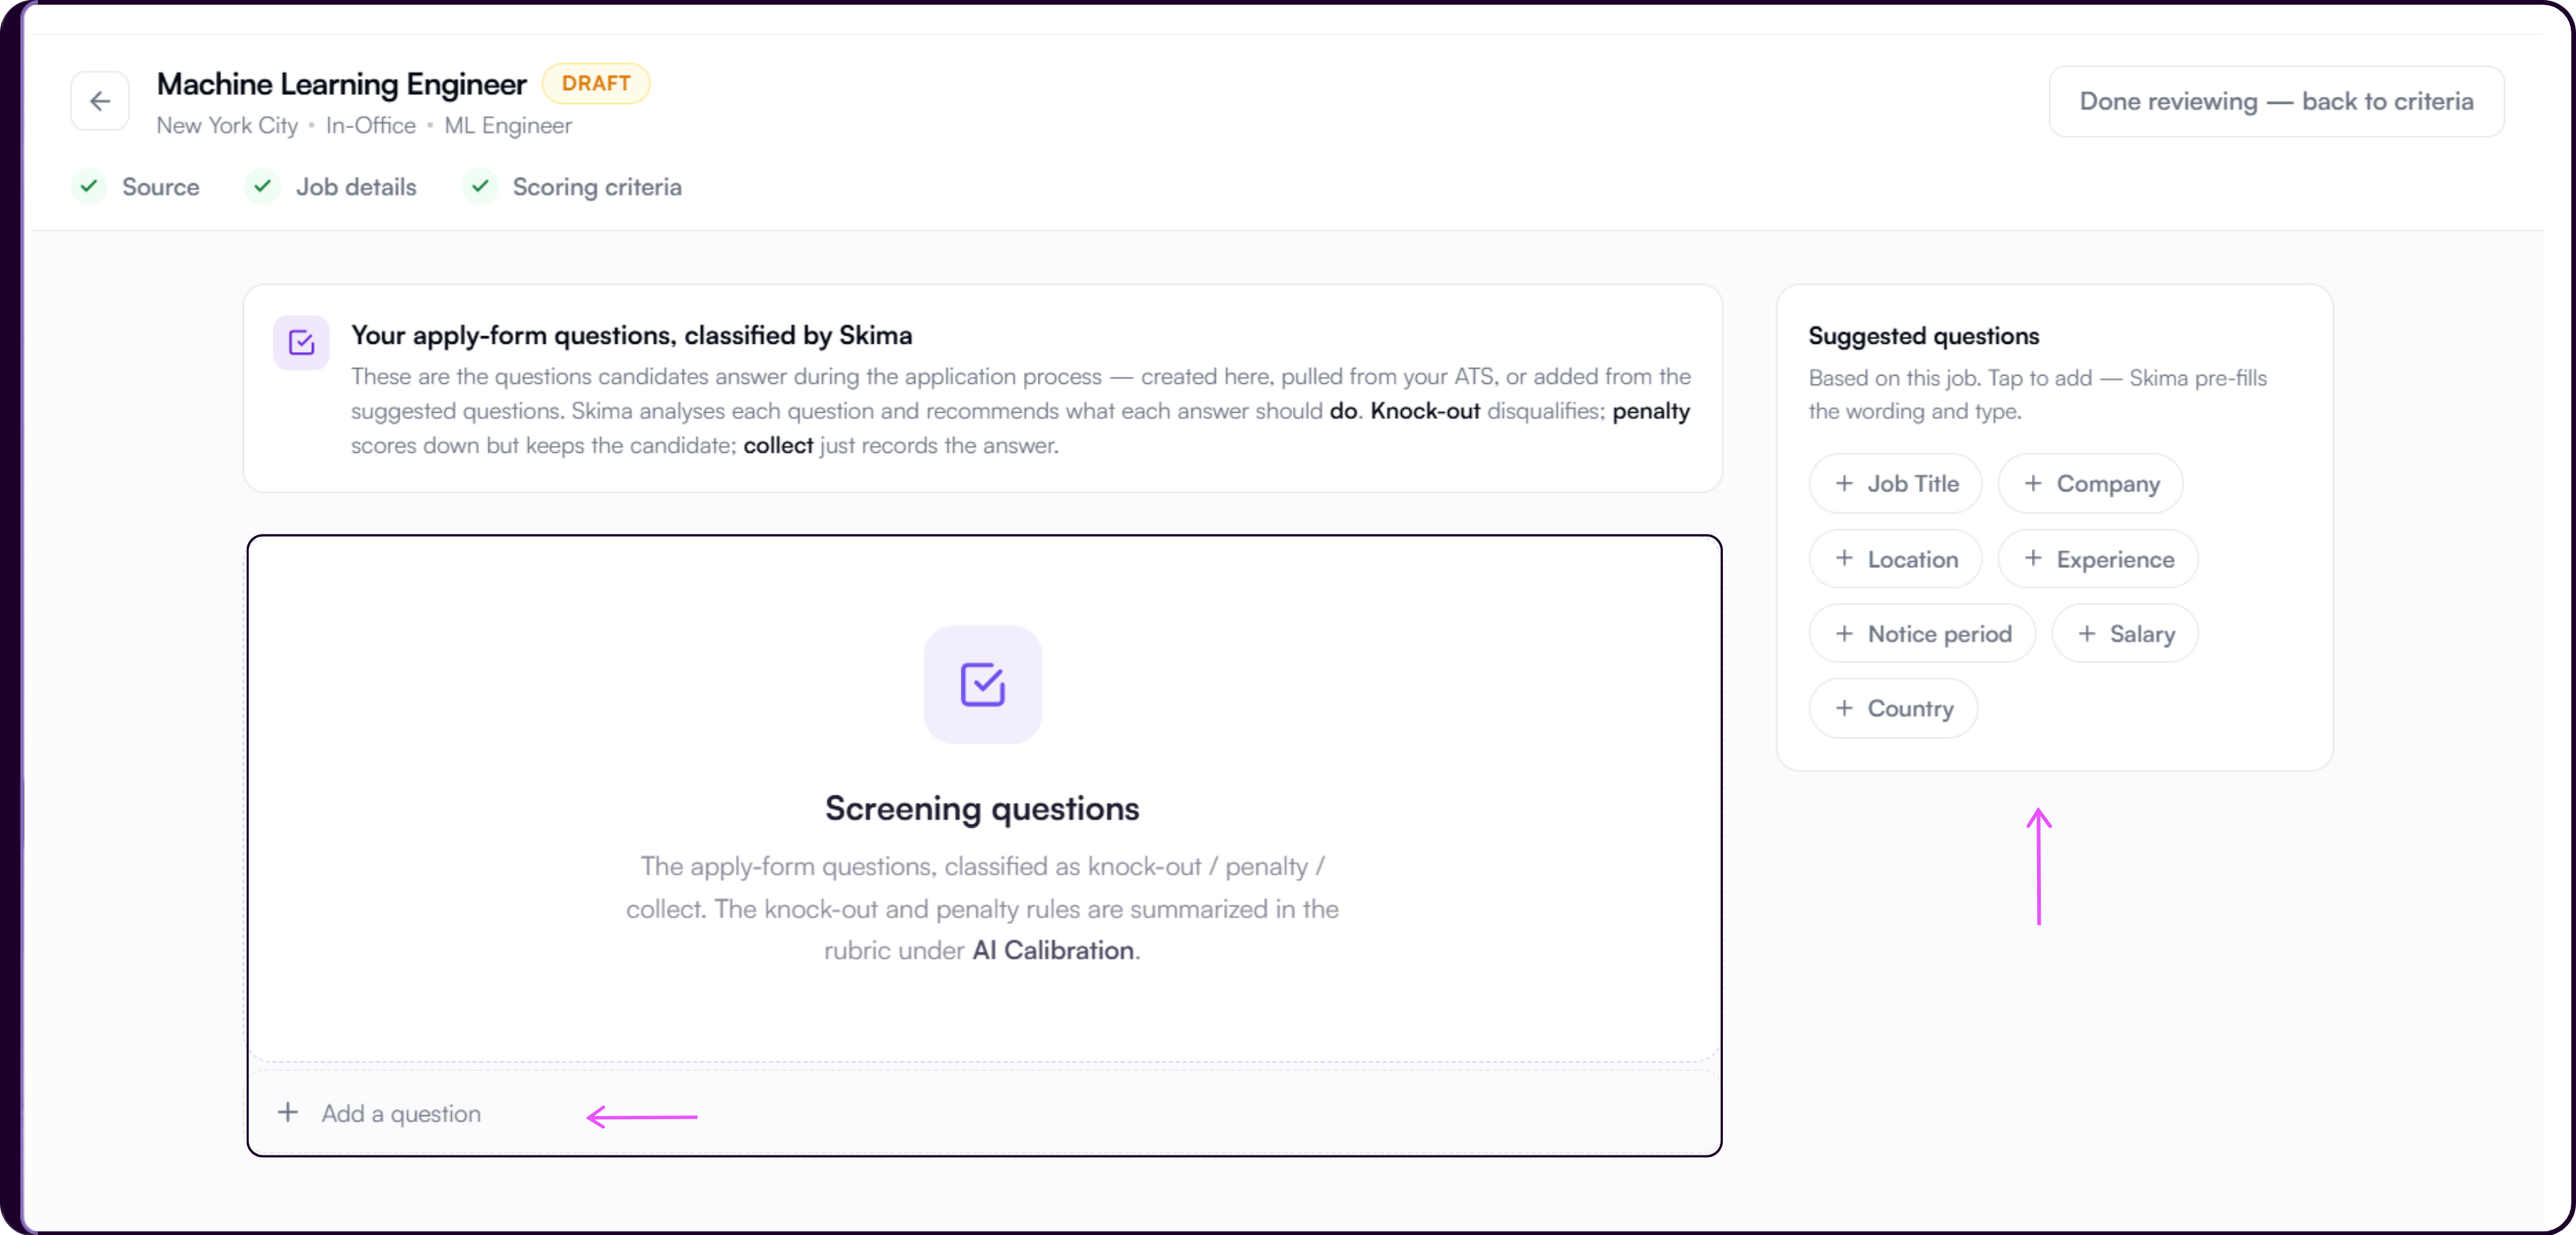
Click 'Screening questions' in the top right of the Scoring criteria screen to open the screening questions view. This replaces the rubric panel and shows a full-width questions workspace with a Suggested questions panel on the right.
A banner at the top explains how questions work: Skima analyses each question and recommends what each answer should do. Knock-out disqualifies the candidate. Penalty scores them down but keeps them in the pipeline. Collect records the answer with no automatic effect on scoring.
When no questions have been added yet, the main area shows an empty state with an '+ Add a question' link at the bottom.
Suggested Questions
The Suggested questions panel on the right shows quick-add options pre-filled by Skima based on the role: Job Title, Company, Location, Experience, Notice period, Salary, and Country. Tap any of them to add the question instantly. The wording and answer type are pre-filled. You can add equivalents or remove existing ones after the question is added.
Adding a Custom Question
Click '+ Add a question' at the bottom of the questions area to create a question manually. Choose the answer type and check the Required box to make it mandatory. Click 'Add a Question' to save it.
Knock-out and penalty rules from screening questions are summarized in the rubric under AI Calibration. Screening questions can be reviewed and managed later from the Screening Questions tab inside the job workspace.
Click 'Done reviewing, back to criteria' in the top right to return to the rubric.
Publish Scoring
Once you have reviewed the rubric and configured any screening questions, click 'Publish scoring' in the top right corner.
If screening questions need review before publishing, a 'Review screening question' warning will appear beside the Publish button. Address these before publishing.
After publishing, the job status changes from Draft to Live and a confirmation screen appears.
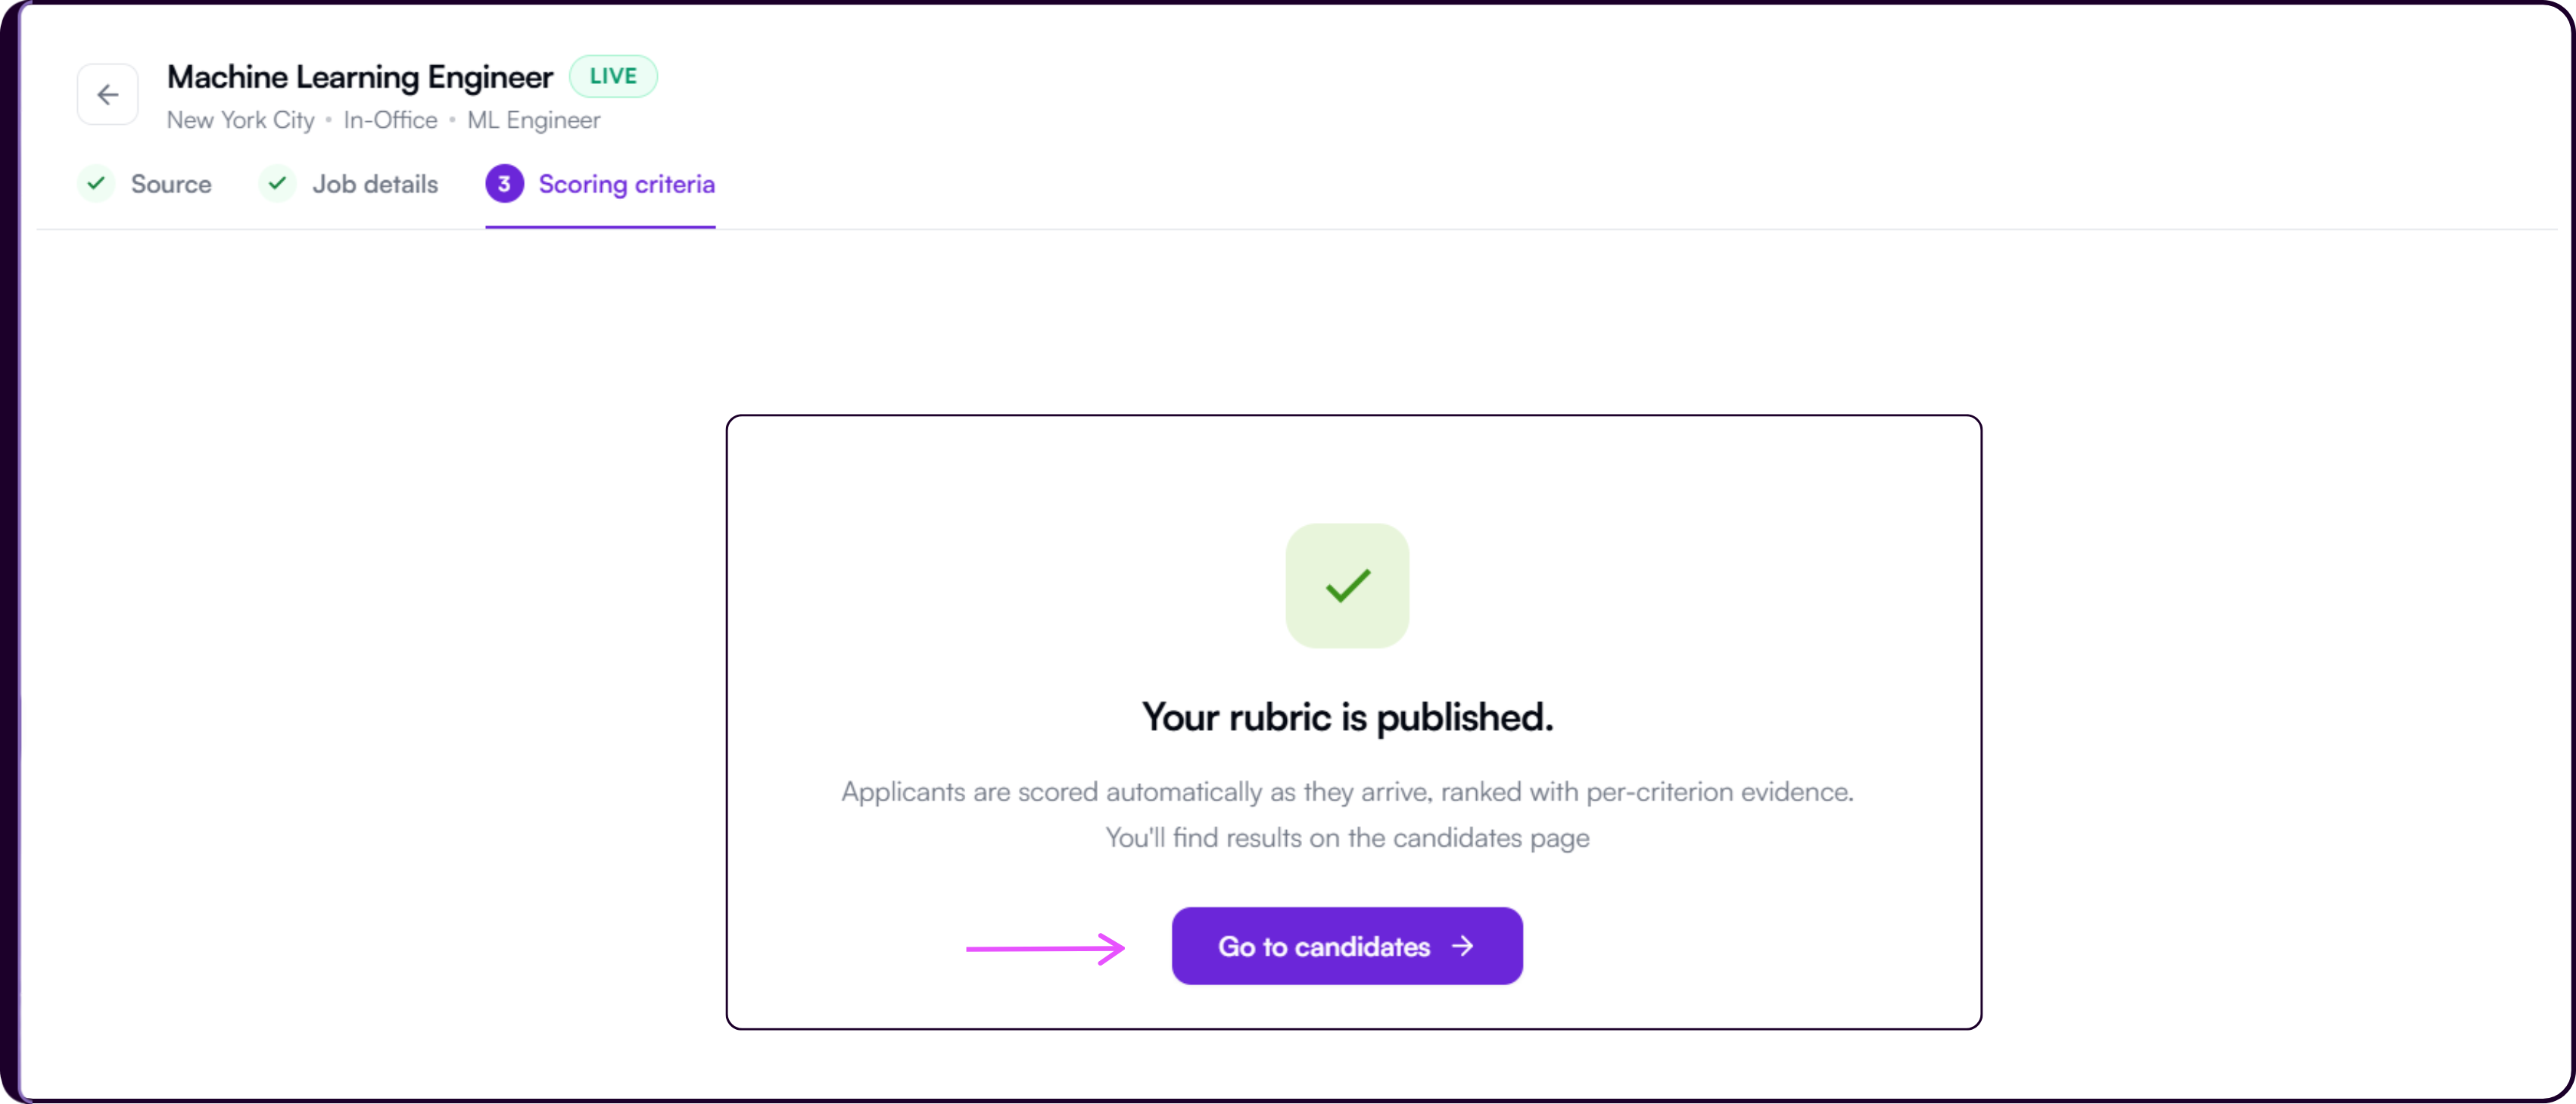
Click 'Go to candidates →' to open the job workspace and begin adding candidates for screening.
View and Edit the Scoring Rubric
After the rubric is published, you can view the active scoring criteria at any time from the View Candidates tab.
- Click 'AI Calibration' in the top-right area of the job workspace.
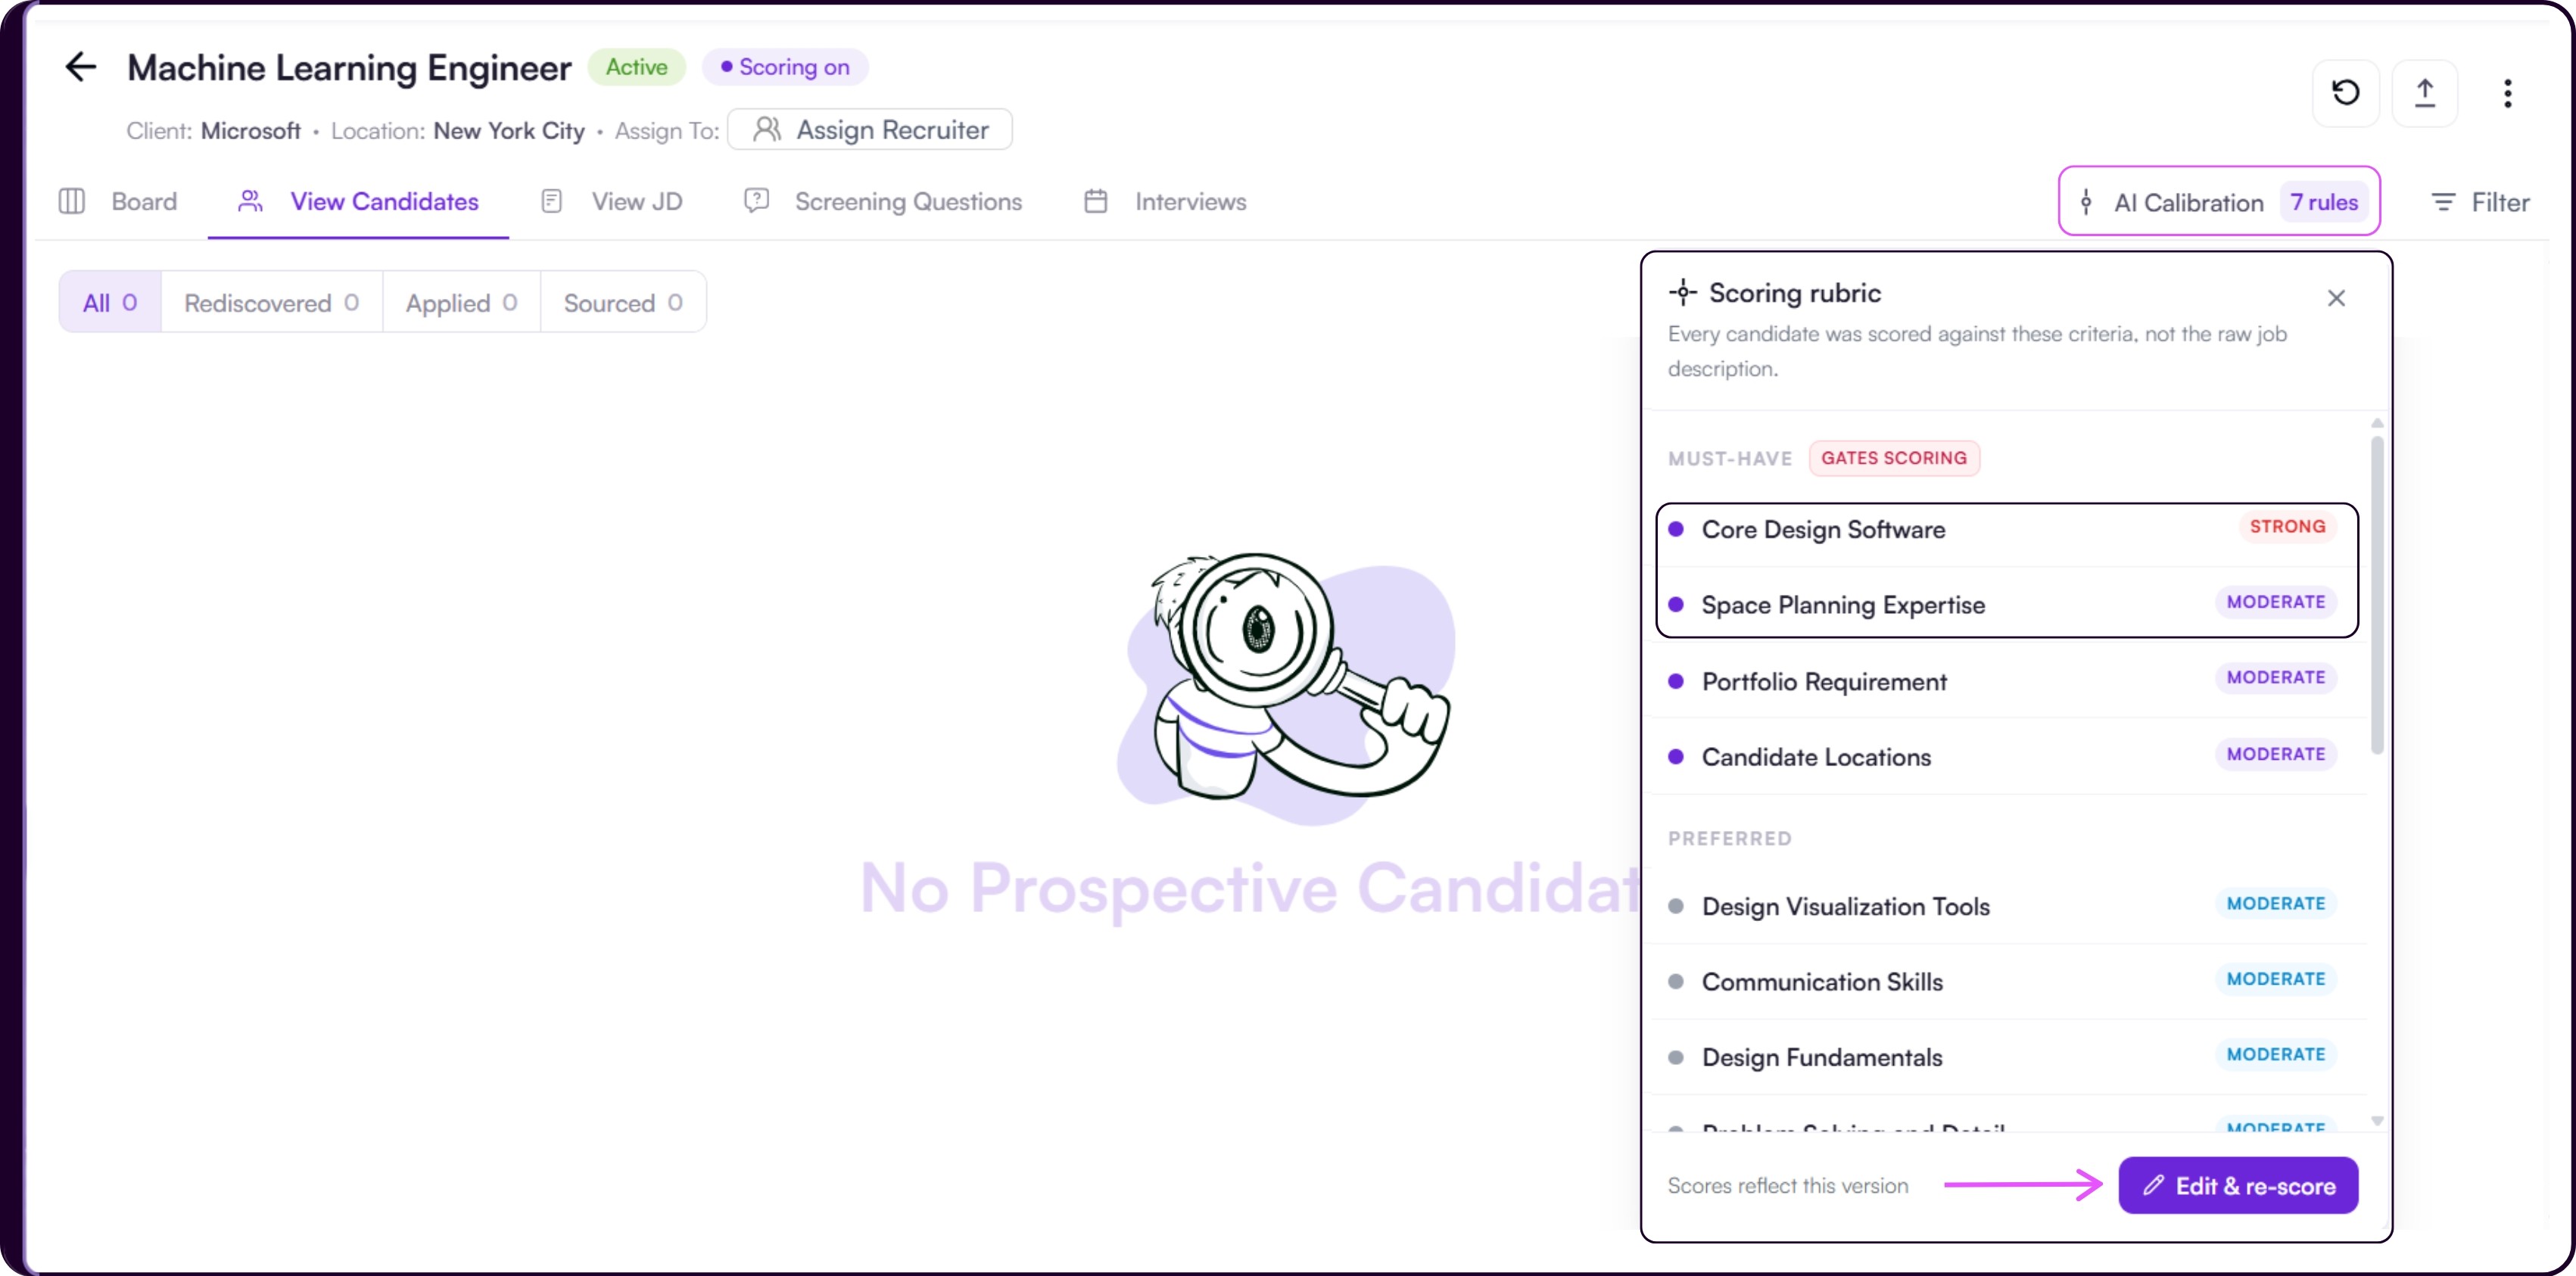
A Scoring rubric panel will appear listing all active criteria the job is currently scoring candidates against, organized by tier, each carrying a Strong or Moderate weight tag.
The panel also shows a Gates Scoring label on the Must-have section, indicating that missing any of these criteria caps a candidate's score.
To make changes, open 'View JD' and click 'Edit Job Description'. This takes you back to the Scoring criteria step, where you can edit the JD, update criteria, reweight them, or add new ones.
Once you publish the updated rubric, all candidates linked to the job are re-scored automatically against the new criteria.
The AI Calibration button also shows how many active rules are currently applied, for example 10 rules. This count updates each time you publish a new version of the rubric.
Add Candidates to the Job
Once the rubric is published, you will land on the View Candidates tab. If no candidates have been added yet, the page will show a No Prospective Candidates empty state.
- To upload resumes, click the upload icon in the top-right area of the job header.
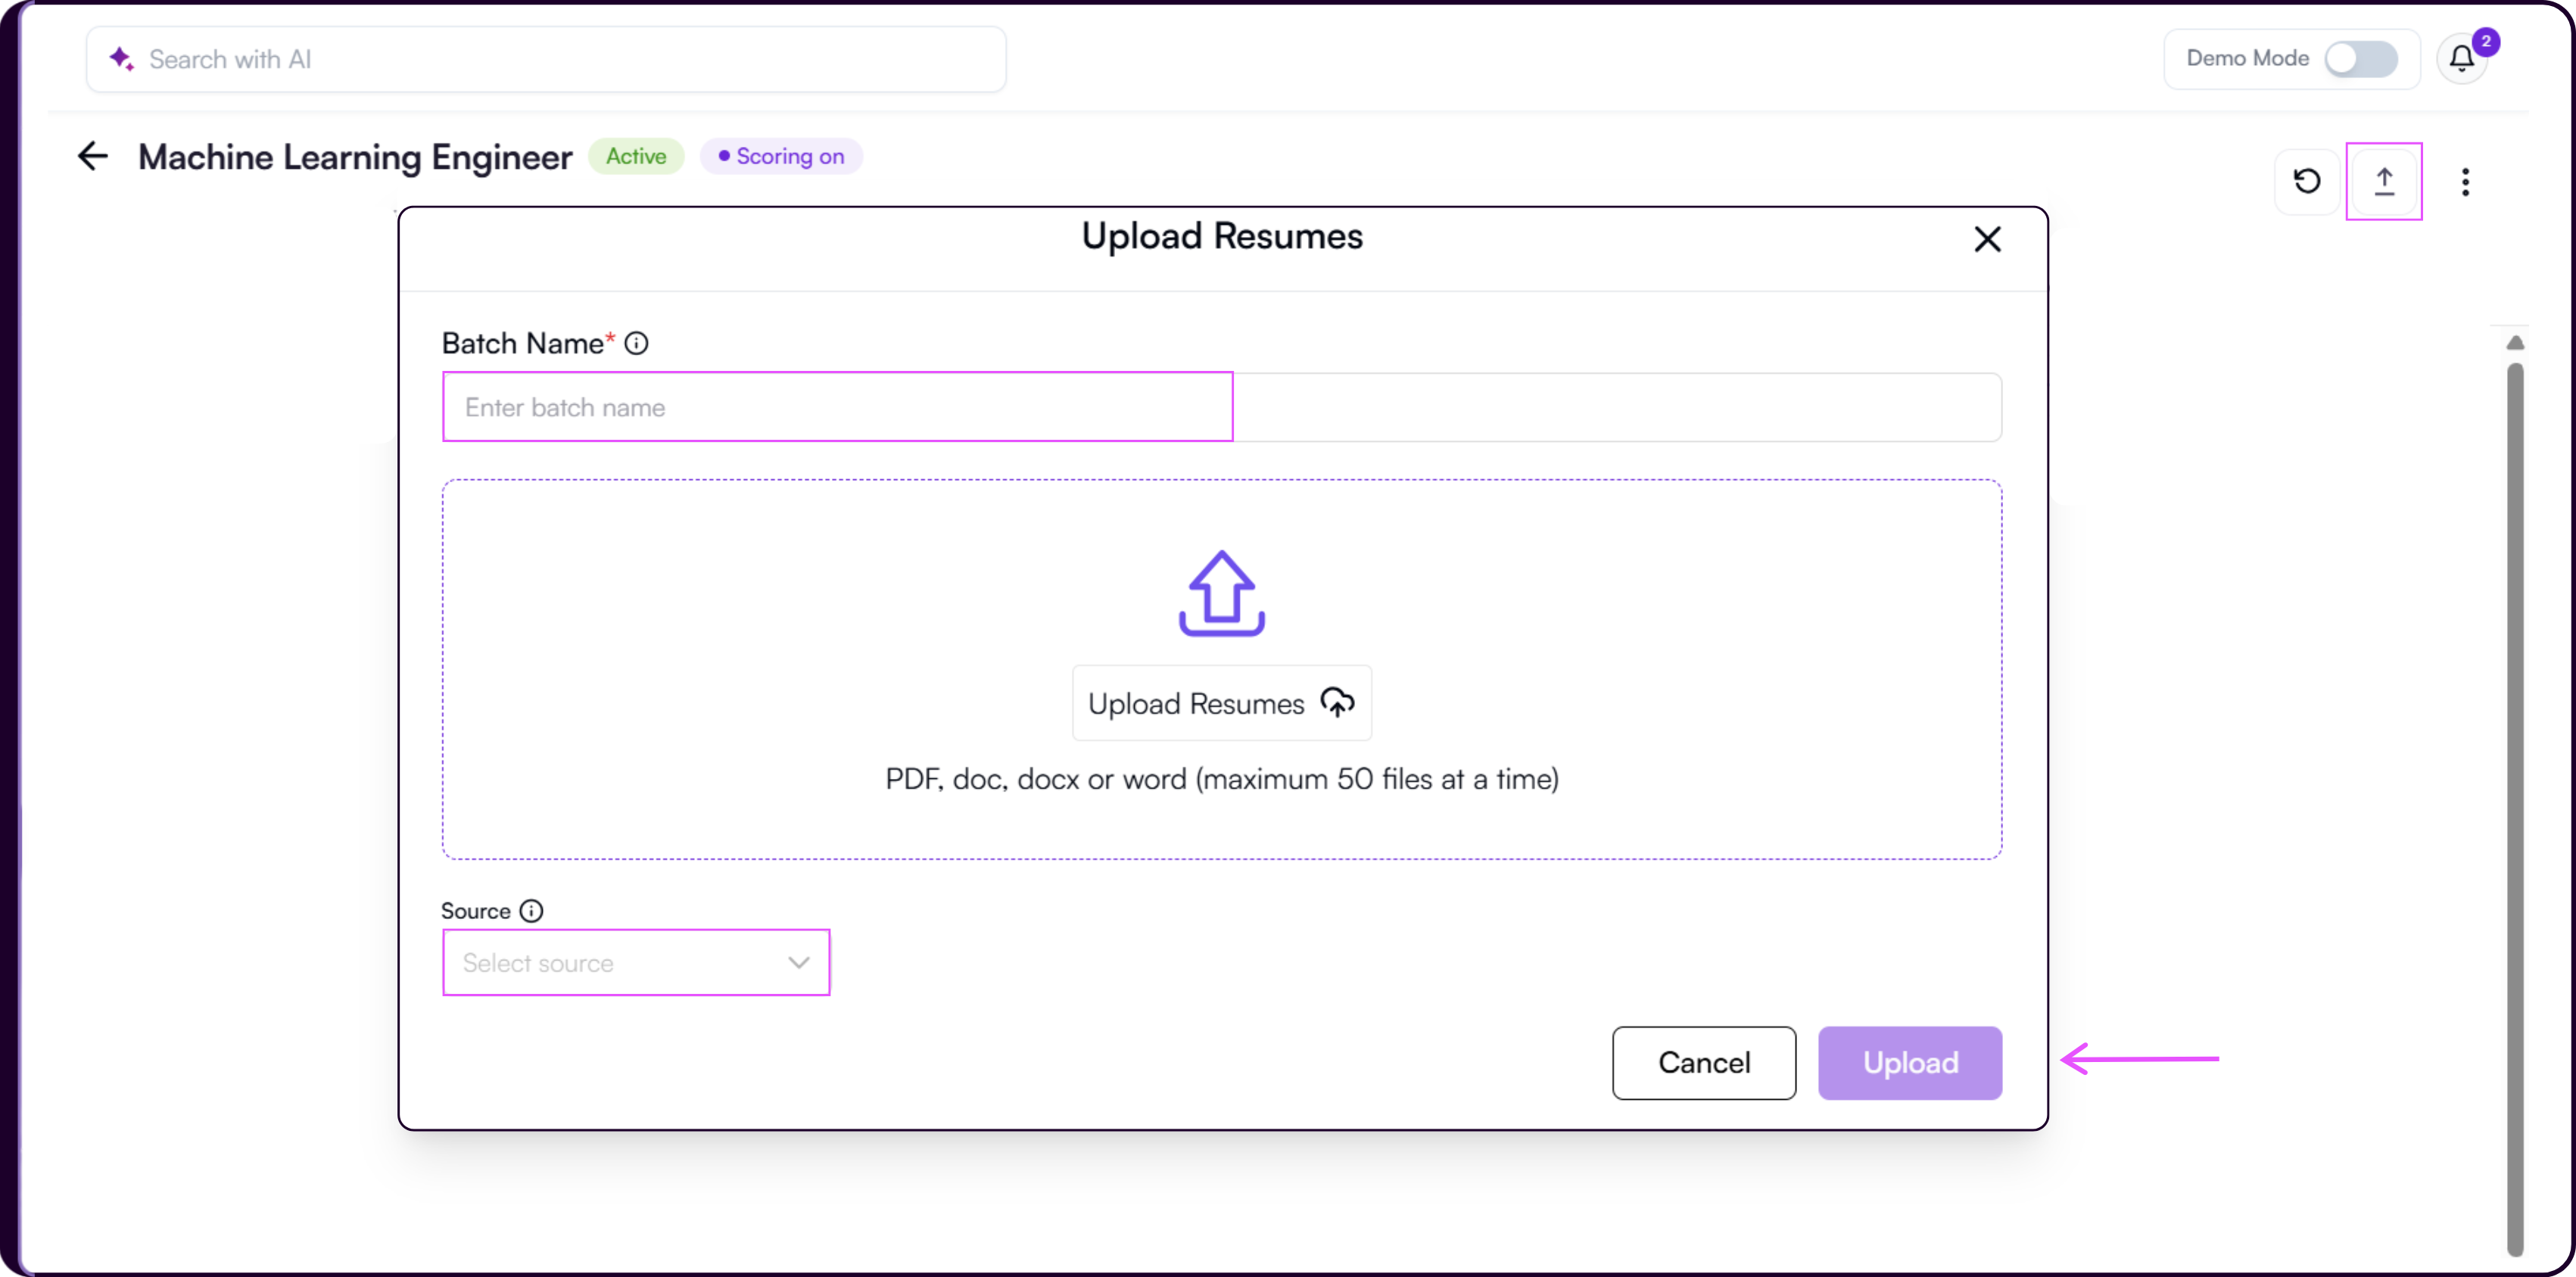
An 'Upload Resumes' modal will appear where you can enter a batch name, select resumes from your system, and choose a candidate source from the dropdown.
Supported formats: PDF, DOC, DOCX, and Word. You can upload up to 50 files at a time.
After clicking 'Upload Resumes', an 'Uploading Files' progress modal will appear showing upload and parsing progress for the batch. Do not close or refresh the window while this is in progress.
Skima AI will automatically parse resumes, apply the scoring rubric, and rank candidates once processing is complete.
You can also upload candidates directly from job boards like LinkedIn using the Skima AI Chrome Extension. Refer to the Chrome Extension guide for setup and usage.
Deleting Jobs
Jobs that are no longer active or required can be removed from the Jobs page.
Navigate to the Jobs list page. Find the job you want to delete.
Under the Actions column, click the three-dots menu beside the job.
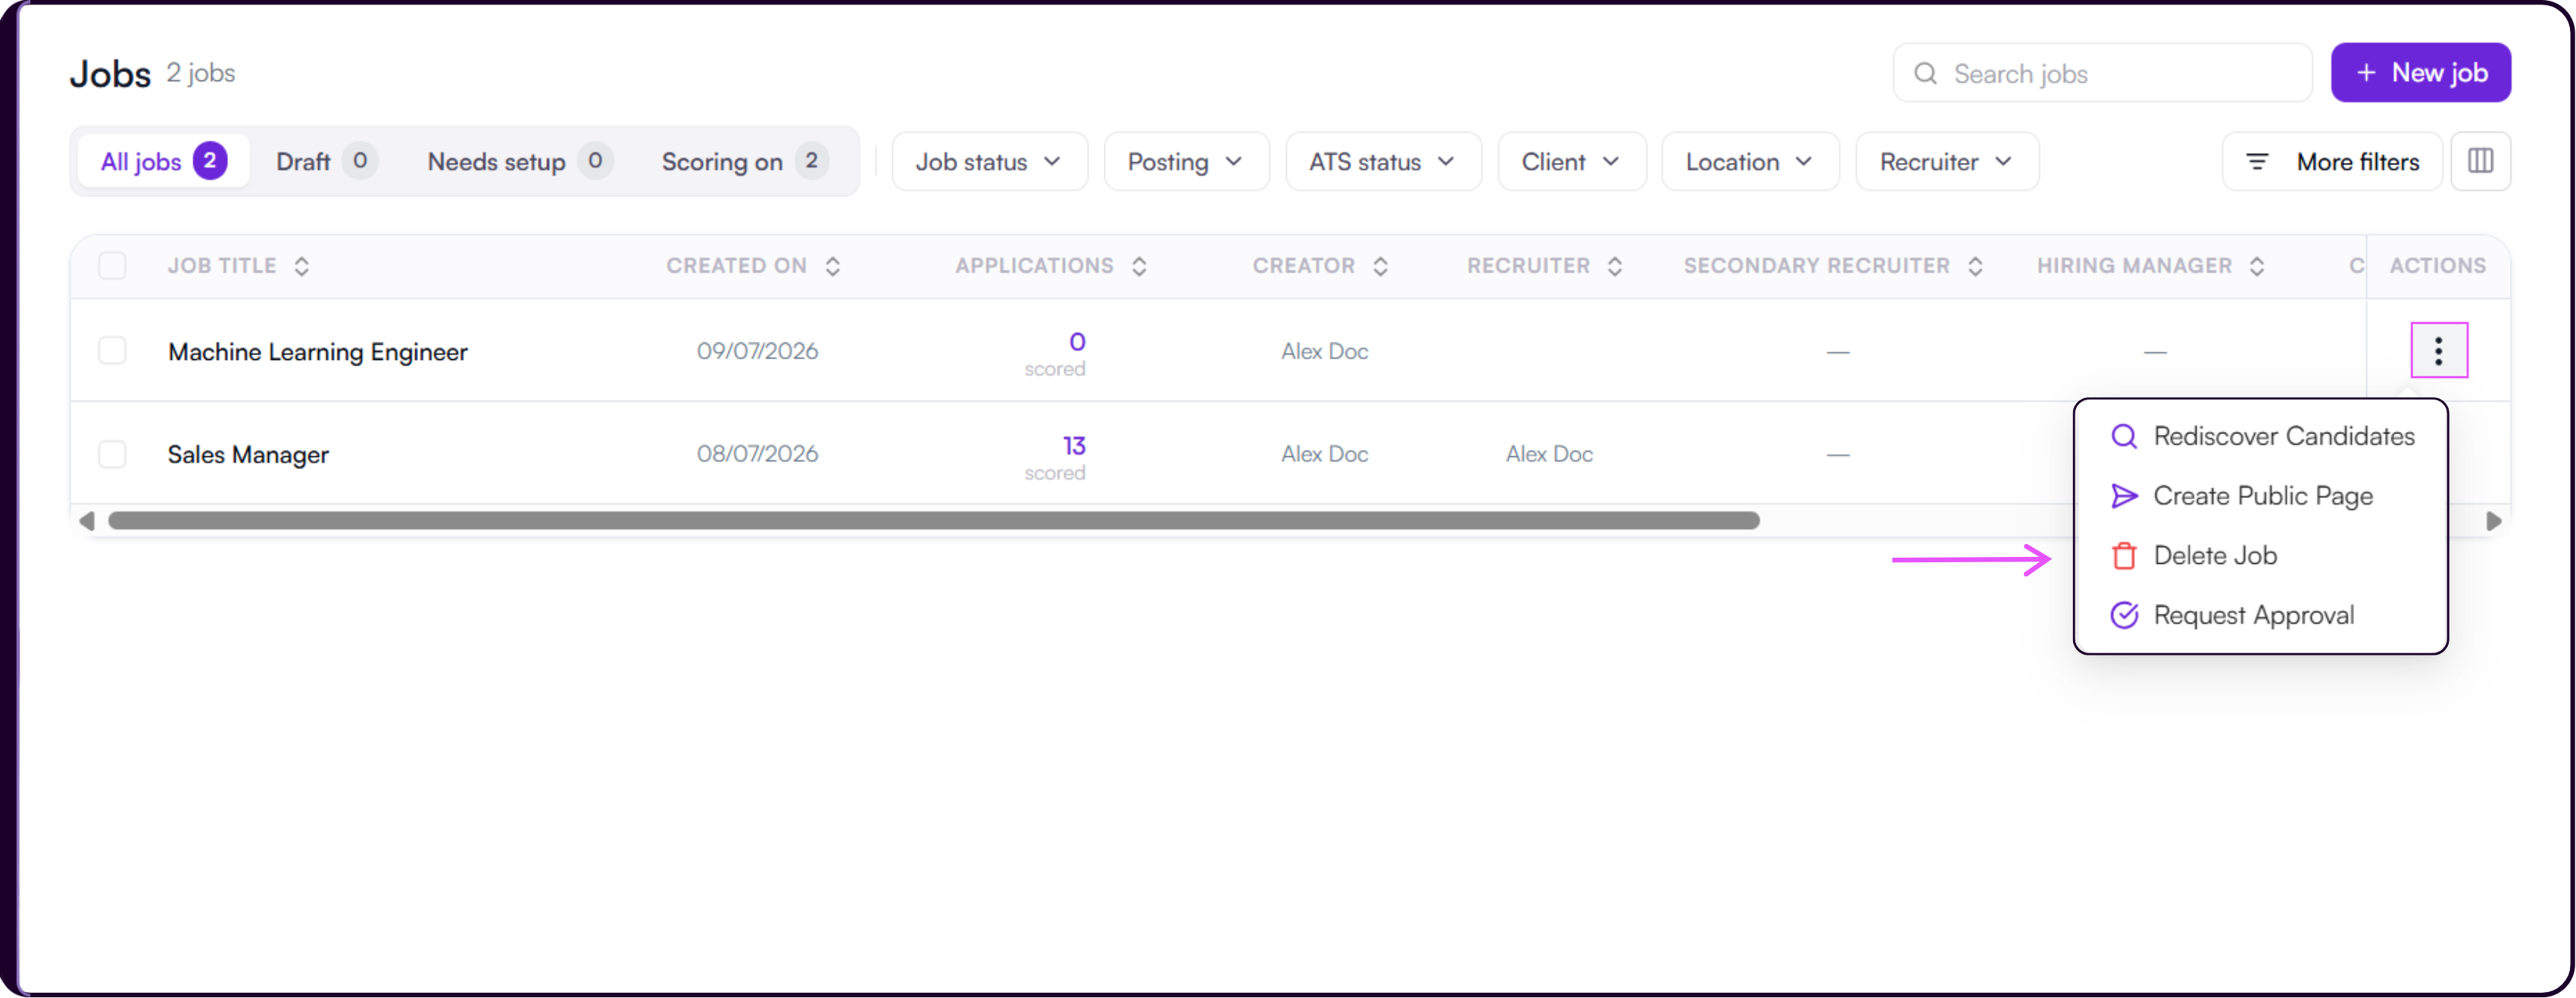
Click 'Delete Job'. A confirmation message will appear. Click 'Yes' to confirm.
You can also delete multiple jobs at once from the Jobs list. Select the checkboxes beside the jobs you want to remove.
A bulk action bar will appear at the bottom of the page showing how many jobs are selected. Click 'Delete' to remove all selected jobs at once
A confirmation modal will appear. Type
DELETEin the input field and click 'Delete jobs' to confirm.
Deleting a job is a permanent action. Make sure the role is no longer required before confirming. If the job has been published, you must unpublish it first before it can be deleted. Refer to the Publishing Job guide for the unpublish steps.